Review: Gigabyte GA-7DXR

Introduction

Prior to the GA-7DXR, Gigabyte released another AMD760 based motherboard - the GA-7DX(C). While the name suggest, that “the R" is just a slightly refined version of the vanilla GA-7DX (which was one of the first, if not the first overall AMD760 based motherboards released in its “C” version), the GA-7DXR is in fact a completely new product with no similarities apart from the AMD chipset itself.

The GA-7DX seemed to be a relatively poor performer, in a review from tomshardware.com from August of 2001, it was the slowest AMD760 board out of nine tested. The GA-7DXR however, was one of the fastest.

In total, there exist six versions of the “7DX” line of boards (sorted by release date):

  • GA-7DXC
    The initial AMD760 offering by Gigabyte. It supported only FSB100 operation.
  • GA-7DX
    From Rev. 3.0 and up, the GA-7DXC was sold as GA-7DX, retaining the same PCB layout. FSB133 is now supported.
  • GA-7DXR
    New PCB layout, adding a variety of OC options, Dual BIOS, IDE RAID, an AGP Pro Slot and a third memory slot
  • GA-7DXR+
    New PCB layout again. New features: jumperless FSB and voltage settings (VCore range is improved, too), USB2.0, updated RAID chip with ATA133 support
  • GA-7DX+
    Based on the GA-7DXR+ and released at the same time. RAID, USB2.0, AGP Pro and Creative soundchip removed
  • GA-7DXE
    Further cut down budget offering. Compared to the GA-7DX+, there is also the DIP switch for multiplier missing, as well as the Dual BIOS feature, the AMR slot, one fan connector and the WOL feature. Only 2-phase VRM (GA-7DX(+) and GA-7DXR(+): 3-phase).

Gallery

Specifications and Features

Chipset:

  • AMD 761 Northbridge
  • VIA 686B Southbridge

CPU Support (with latest BIOS):

  • Athlon Thunderbird (ALL)
  • Athlon XP Palomino (ALL)
  • Athlon XP Thoroughbred (all FSB266 models up to 2600+)
  • Duron Spitfire (ALL)
  • Duron Morgan (ALL)
  • Duron Applebred (ALL)

Memory Support:

  • 3 DDR DIMM slots, up to 3 GB total

Expansion Slots:

  • 1x AGP Pro slot (1,5 / 3,3V) up to 4x
  • 5x PCI slots
  • 1x AMR slot

Connectors (internal):

  • 2x IDE (UDMA100)
  • 2x IDE (UDMA100/RAID)
  • 1x Floppy
  • 2x USB 1.1
  • 3x 3-pin fan connectors total (1x CPU, 2x chassis)

Connectors (external):

  • 2x PS/2
  • 2x COM/RS-232
  • 1x Parallel Port
  • 2x USB 1.1
  • 3x 3,5" Audio Jacks (Line-Out, Line-In, Mic)
  • Gameport

Other than most motherboards of that time, this one actually has a relatively decent audio chip onboard, which is the Creative CT5880. This is essentially a Soundblaster 128 PCI, which is definitely a step up in performance and compatibility compared to your average Realtek or C-Media chipset. Still, a decent chip does not make a good soundcard, as the remaining parts responsible for the analog audio output play an important role on how good it sounds. A dedicated soundcard will always be the best solution.

Very commonly recommended are the Creative Soundblaster Live! cards for example, which offer fantastic compatibility with our beloved old games and sound far better than any onboard solution of that era.

I also don't list (from a retro-gamers perspective) useless connectors and features like IR, Smartcard- or Wake-on-LAN connectors and so on.

Overclocking Features:

- Adjustable Multiplier (DIP switch) from x5 - >=x12,5
- Adjustable FSB (BIOS) 100 - 250 MHz in 1 MHz steps
- Adjustable FSB (DIP switch) 95 / 106 / 114 / 120 / 133 / 140 / 150 MHz
- Adjustable VCore (BIOS) from 1,750 V to 1,850 V in steps of 0,025 V
- DDR Voltage (DIP switch) from 2,50 to 2,70 V in steps of 0,10 V
- AGP Voltage (DIP) from 1,50 to 1,70 V in steps of 0,10 V (explicitly called “AGP 4X Overvoltage Switch”)

While the GA-7DXR offers quite a lot in terms of overclocking, it leaves a lot to be desired in detail. First of all, there are lots of DIP switches and even more tables and markings on the board, that have to do with voltage-, FSB- or multiplier settings. Since half of the parts to adjust these settings (VCore DIP switch, JP19+JP20 for FSB) are missing, but the tables with the associated settings are not, this does not contribute to an easy setup experience. Furthermore many of these settings are redundant or contradictory. For example:

The DIP switch for mulitplier adjustment has six switches, the printed table contains only settings for five of them. The manual also does not mention the sixth switch with a single word. So what does it do? Nothing?

There is no “Auto” setting for the FSB DIP switch, nor is there a jumper or something else to select if the DIP- or BIOS FSB settings being preferred. Help? Also, if the jumpers JP19+JP20 would be present, there even was a third place where you could adjust (potentially conflicting) FSB settings.

The sheer flood of tables, jumpers and DIP switches definitely require some exploration when setting up. But this was one major point that got vastly improved on its successor, the GA-7DXR+.

Documentation, Downloads, Drivers

Since Gigabyte is still around today, finding needed files and information like BIOS updates, a CPU support list, the manual or drivers is refreshingly straightforward.

The support site for the GA-7DXR can be found easily when you go to your search engine of choice and type "ga-7dxr support".

Gigabyte offers the latest three BIOS versions including the final BIOS “F10” for download. The required flashtool as well as a pre-configured autoexec.bat file is also included in the download, so you only have to put the contents of the archive on your bootable floppy, boot from it and the flashtool starts automatically. All you have to do is confirm the preselected BIOS file and the flash process itself.

The manual and a CPU support list can also be found on the support site.

While the CPU support list is helpful, the manual is more confusing than helpful. The are lots of descriptions and pictures of options and features, that are not included or present on the board (we'll get into that in the next part of the review in-depth) and the description of the DIP switches that are actually present, do not extend the information that is already printed to the board.

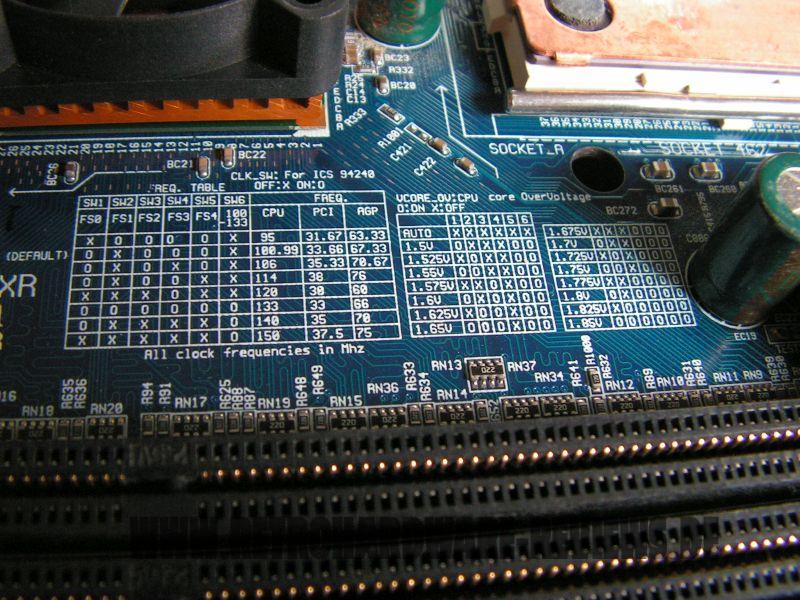
The description of the most BIOS options is relatively extensive, but the “interesting” options that are related to chipset or memory settings are limited to listings of the possible values.

In the drivers section of the support site, there are drivers for the Creative audio chip, the promise RAID chip, as well as AMD AGP drivers available. The AGP driver is the most recent for Win9x, the Promise driver is rather old, the CT5880 (SB128 PCI) driver should be pretty recent. Alternatively, regular Creative Soundblaster 128 PCI drivers should work (I didn't test that).

If you plan to use rather “new” and/or “big” hard drives in combination with the onboard Promise controller, I recommend to download the latest driver the manufacturer's website: https://www.promise.com/Support/downloadcenter

Design & Layout

I think the overall look of the board is great and Gigabyte has done many things right in terms of layout. Both the IDE and floppy connectors are placed to the right of the memory slots at the edge of the PCB, so that they don't get in the way with expansion cards and the ribbon cables can easily be routed away from the board. The additional IDE connectors of the Promise RAID chip are also placed well in the lower right corner of the board.

There is enough distance between the memory slots and the AGP port, to make it possible to swap memory modules while an AGP card of any length stays in its slot. The space around the CPU socket is relatively generous and there are no tall capacitors around it, which makes the installation of CPU coolers an easy task.

I tested the following seven coolers towards compatibility and all of them could be installed, with only one having some issues, which we will see in a moment:


  • Thermaltake Silent Boost K7
  • Cooler Master HHC-001
  • Swiftech MCX 370
  • Alpha PAL 6035
  • Alpha PAL 8045
  • Smartcooler 60mm
  • Arctic Cooling Copper Lite

Since the CPU socket is located rather close to the top edge of the PCB, the huge Alpha 8045 reaches a tiny bit over the edge of the board. But this shouldn't prevent it from being installed even in the tightest in-case situations.

This is a different situation with the Cooler Master HHC-001, however. On the one hand we have its “common” problem with the lever reaching far over the edge of the PCB, but on the GA-7DXR its heatpipes also collide with the capacitors to the right of the CPU socket. Since it only has a one-lug mounting clamp, the whole cooler can be turned a little to make it fit. But this really doesn't look very good and you are better off choosing another cooler.

But let's get back to the “Design” part. If we take a more technical approach to this topic, I think the way the adjustment of CPU parameters and voltages is handled is really confusing and bad (as I already mentioned before). The DIP switch for FSB could have been removed alltogether and if I, as a manufacturer, decided to allow multiplier adjustments only by using a DIP switch, then why has the switch to be to the left of the PCI slots, where it potentially gets blocked by PCI cards and is hard to reach in general?

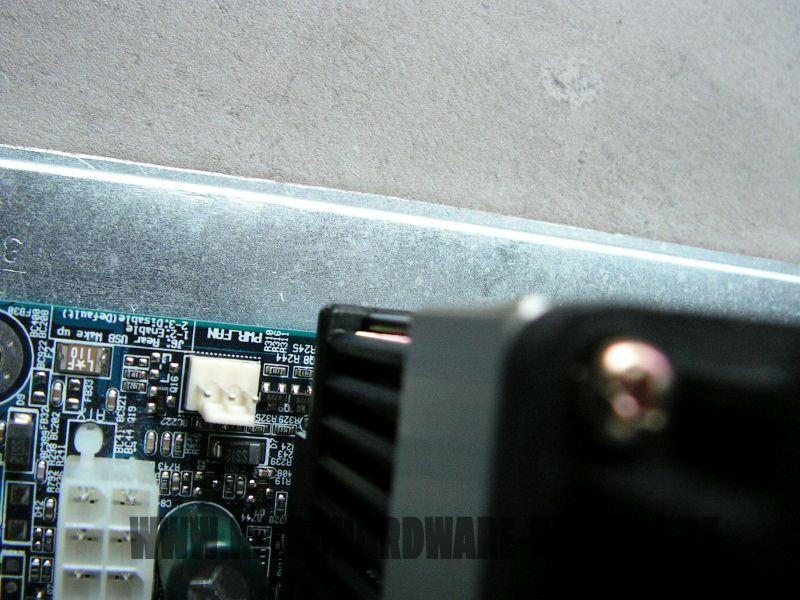
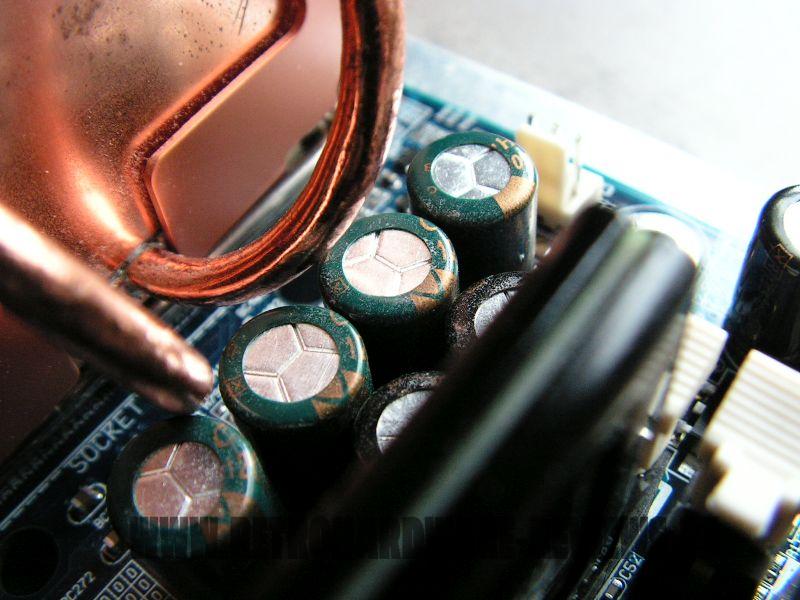
Multiplier DIP Switch blocked

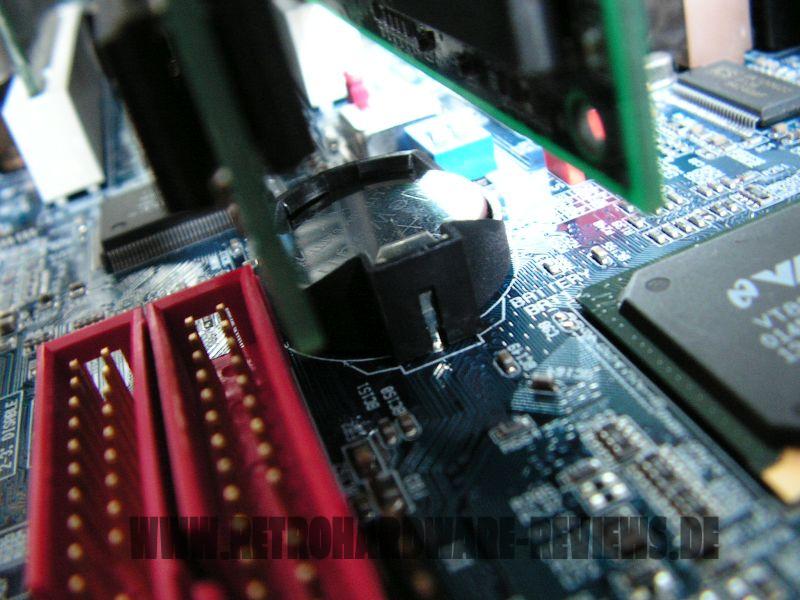
CMOS Battery blocked

The CMOS battery socket is also placed in a location, where it possibly gets covered by long PCI cards. But I have still seen worse locations for it and your average sound-, USB- or networking card will still fit without blocking it. A more substantial layout problem is the location of the ATX power connector, which sits in the top left corner of the board. Since the CPU socket is located so close to the top edge of the board, it is very likely, that the ATX power cable has to be routed below the CPU socket, affecting the airflow for the VRM area and the chipset.

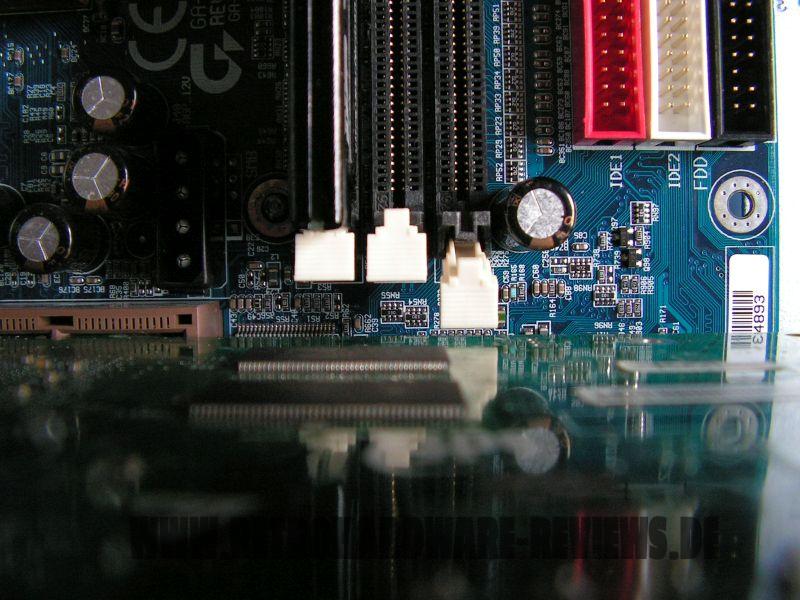
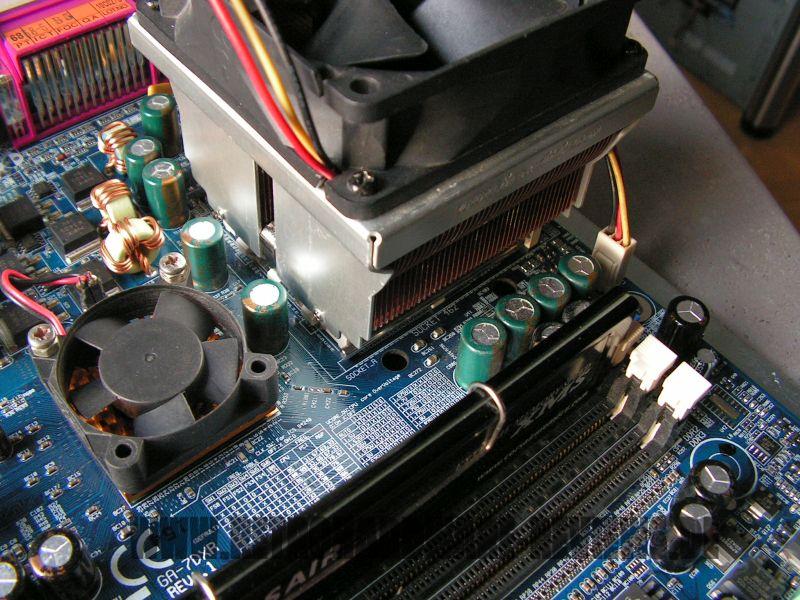
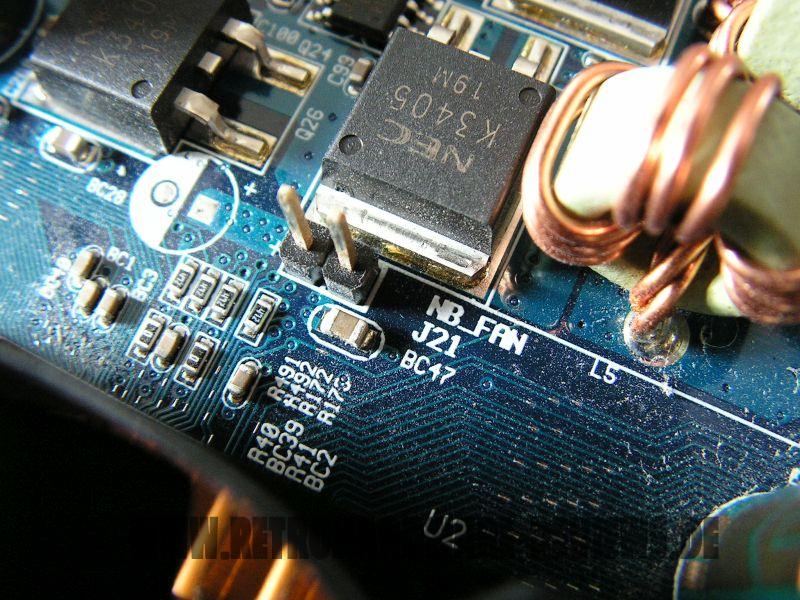
Another small annoyance is the location of the “SYS_FAN2” connector. While the location of the “PWR_FAN" in the top left corner is perfect for connecting a rear fan, the bottom left corner (where the SYS_FAN2 connector is placed) is most likely out of reach for the front fan.

But now, like previously announced, let's get to the analysis on what parts are missing on the board and why that may be. This is a layout illustration from the manual, where I marked and numbered every missing part:

01: CPU Guardian Jumper. NOT listed as optional.
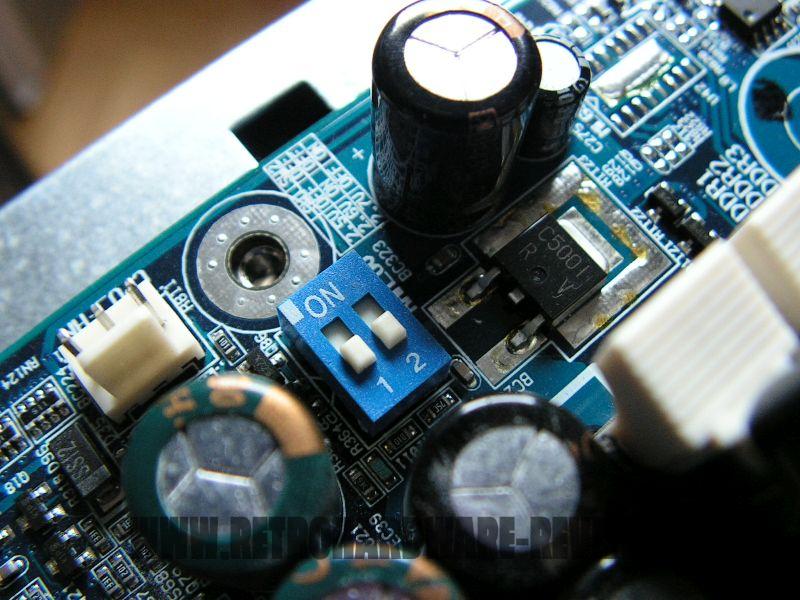
02: CPU Core Overvoltage DIP Switch. Manual lists it as optional.
03: J30: RAM LED connector. Manual lists it as optional.
04: AUX in for onboard audio. Manual lists it as optional.
05: System Fan 1. NOT listed as optional
06: AMR_EN1 & AMR_EN2 (AMR Selection). Manual lists them as optional.
07: External SMBUS Device Connector. Manual lists it as optional.
08: TEL in for onboard audio. Manual lists it as optional.
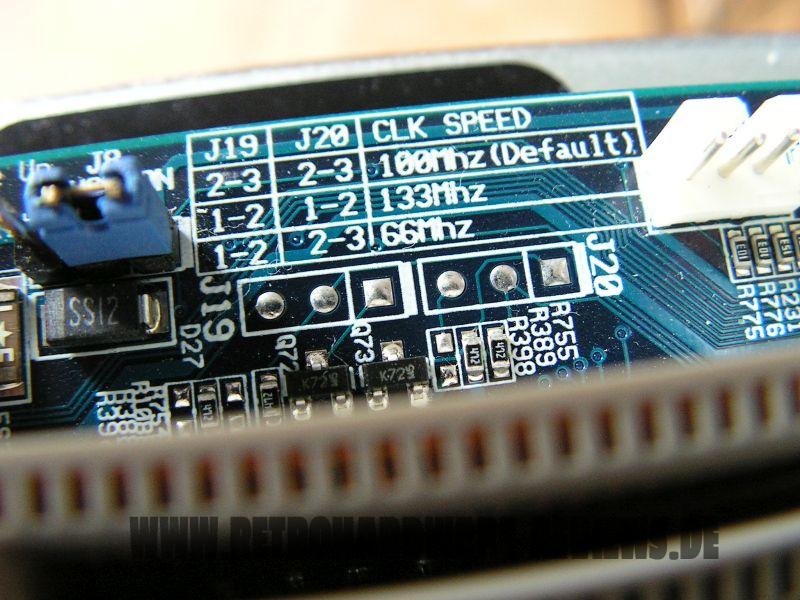
09: J19 and J20 are jumpers for 66(!)/100/133 MHz FSB. Manual lists them as optional.
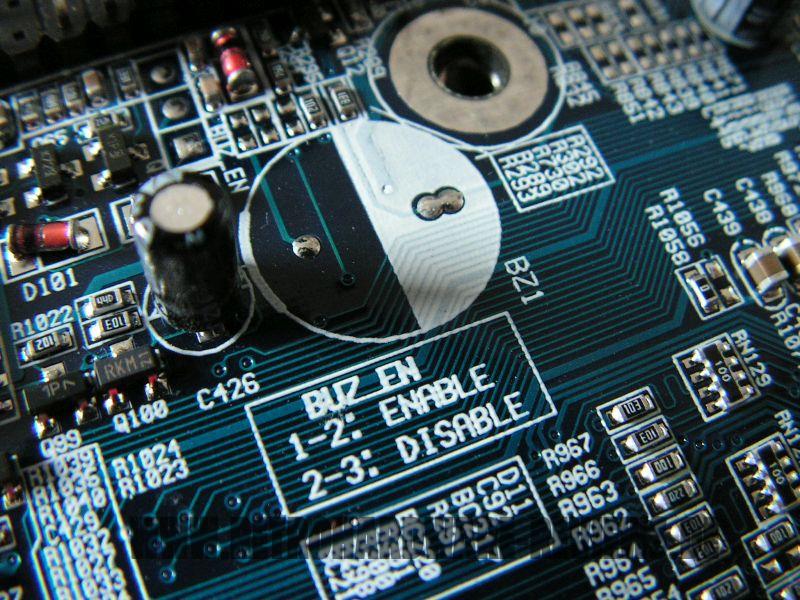
10: Buzzer and Jumper to en- and disable it. Manual lists them as optional.
11: BIOS Write Protect Function Jumper. Manual lists it as optional.

There is also an empty soldering spot for another USB connector ("USB3") present on the board, that is located to the right of “USB2”, which is not included at all in the layout overview above. This connector is present on the product picture on the Gigabyte website however, which apparently shows a pre-release version of the board, that never hit the market like pictured.

In fact, I think that all the parts listed as “optional” in the manual are missing on every single board sold. I looked at all the pictures I could find online, be it from old reviews or from ebay sales and what not. From what I could recognize (the old pictures are sometimes really tiny and bad), all the parts that are missing on my board, are missing on all other Rev 1.0 and up boards, too.

The only pictures that show the CPU Core Overvoltage DIP switch for example, are definitely pre-release samples, which is easy to identify by how the chipset fan is connected. On the board pictured on the Gigabyte website, the chipset fan is connected to the now missing SYS1 fan connector. Where the chipset fan connects to a simple 2-pin connector on Rev. 1.0 and later boards, the pre-release board has a capacitor in that location instead.

It is really sad, that Gigabyte removed all these parts and features, because aside from the oviously bitterly missed Core Overvoltage DIP Switch, there could have been a feature that would make the board standout compared to every Socket A board. I am talking about the option to set the FSB to 66 MHz - how cool would that have been? Not that it would have any practical use whatsoever, but I'd love to take a screenshot of an Athlon running at 333 MHz (5x66) <3

Another cool feature would have been the RAM LED connector (J30), at least if flickers differently depending on memory usage, much like Corsair XMS Pro memory sticks. I like to imagine it working that way, more likely it would operate identical to the SMD LED that is already soldered to the board right next to the missing connector, but hey,.. dreams 🙂

Test-System and Parts

Baseline Setup:

  • CPU: AMD Athlon Thunderbird 1200C (FSB133)
    Because I want to compare 1st Gen Socket A mainboards to their DDR follow-ups I have to use a CPU, which is available in FSB100 and FSB133 versions with the same clockspeed. Since I sadly don't have a Thunderbird 1400 B at my disposal, I will use the Thunderbird 1200 for my reviews and comparisons of these boards, which I have in the “B” (FSB100) and “C” (FSB133) version.
  • RAM: 1x Corsair CMX512-3200C2 (XMS3202v4.2) = 512MB PC400 CL2
    This Corsair XMS stick should allow the tightest timings at 266 MHz DDR and its size of 512MB is the perfect choice for Windows 98SE.
  • VGA: MSI Geforce 4 TI4200-VTD8X
    To remove any GPU bottleneck for testing, I chose a Geforce 4 Ti as the primary graphics card for my test setups. The Geforce 4 Ti series are also known to pull a lot of power from the AGP port, so that possible problems in that department can also be revealed. It is also somewhat period correct and a good match for a high performance retro-machine that should be able to run late Windows 98SE games without any issues.
  • VGA2: 3dfx Voodoo 5 5500 AGP
    Many people consider the Voodoo 5 5500 the perfect card for (Win9x-) retro gaming. The Voodoo 5 benefits from a beefy setup, so a powerful Athlon Thunderbird or early Athlon XP is the perfect match for this card.
  • Audio: Creative Soundblaster Live! (SB0060)
    Creative's Soundblaster Live! can be found in many retro-machines. It offers great sound, perfect Win98SE compatibility and is still widely available for reasonable money. It was also known to cause problems with VIA-based 686B southbridges using old BIOS revisions and VIA chipset drivers. All this should be history at this point, but double checking on pontentially affected mainboards is still not a bad thing to do.
  • LAN: 3Com Etherlink XL PCI
    Just a good, reliable choice for networking. All legacy Windows versions all the way up from Win95 have built-in drivers for it, which is also a huge “plus”.
  • HDD: Western Digital WD200BB (20GB 7200RPM)
    No special intention behind this drive, it is just “there” and still works fine.


Additional Hardware for certain Tests:

  • Silicon Image Sil3512 SATA Controller & Samsung PM871 128GB SSD
    These two will help me measure the PCI bandwidth.
  • Hitachi Deskstar T7K500 (500GB 7200RPM)
    This drive will tell us, how big we can go with the onboard IDE connectors and how the performance is like.
  • 2x Voodoo 2 12MB (SLI)
    A pair of Voodoo 2s is a must have for any retro-machine, that doesn't feature a 3dfx card as the primary VGA solution. They offer compatibility to older Glide games and can be used with any more powerful primary graphics card. It is an important thing to know, how well these perform and if there are differences between all the available Socket A chipsets of that era or even between boards using the same chipset.


Drivers used:

  • Chipset: AMD AGP Miniport 4.80 + VIA Hyperion 4in1 4.56v (without the AGP drivers)
  • Geforce 4: nVidia Forceware 43.45
  • Voodoo 5: Amigamerlin 2.9
  • Voodoo 2: FastVoodoo 4.6
  • SB Live!: Some driver from my archive, not shure 😉
  • 3Com NIC: Windows 98SE preloaded driver
  • SATA Controller: Some driver from my archive, not shure 😉

System Setup and Usage

After I figured out all the necessary DIP settings and jumper settings (which included enabling and disabling the Promise RAID chip, which can only disabled by jumper, in contrast to all other onboard devices, including onboard audio), I started determining the sharing between onboard devices and the PCI slots. The manual doesn't contain any information on that topic, so I figured it out by installing my 3Com NIC into one PCI slot after the other, taking notes on which IRQ got assigned to all listed devices in the POST summary screen.

This is the result:

  • PCI #1: no sharing
  • PCI #2: shared with onboard audio
  • PCI #3: shared with USB controller and Promise RAID chip
  • PCI #4: shared with AGP port
  • PCI #5: shared with PCI #1

Based on the information I gathered, I installed the expansion cards as follows:

  • PCI #1: free
  • PCI #2: SB Live!
  • PCI #3: Voodoo 2
  • PCI #4: Voodoo 2
  • PCI #5: 3Com NIC

I also had the Promise RAID controller enabled during the first set of benchmarks. When I was finished with all the benches, I could complete with this hardware setup, I removed the two Voodoo 2 cards, disabled the Promise controller and installed the SATA controller into PCI #3. During the first boot afterwards, the system got stuck with a blinking cursor. But after a reset, it booted successfully.

I was able to install the drivers for the SATA controller without further issues, completed the benchmark und removed it together with the Geforce 4 card. Next, I installed the Voodoo 5 and did not experience a single problem throughout the testing. Overall, it was a silky smooth experience (after the initial setup 😉 ).

Benchmarks

Synthetic Measurements

Before we get into the 3DMark and gaming benchmarks, let's have a look at some theoretical numbers. These synthetic tests will exhibit the differences between the several chipsets and boards better than any game benchmark and provide us with "background information" that might be of use in understanding the timedemo results later.

Memory Performance: AIDA64 Cache & Memory Benchmark

In terms of memory bandwidth, all AMD761 based boards perform very similar. The GA-7DXR takes fourth place here, but with the exception of the Abit KG7-RAID, all the boards show essentially the same level of performance. In the memory latency measurements the Gigabyte board takes last place along with the EpoX 8K7A, with the MSI board closely ahead. The apperently more optimized boards from Asus and Abit show considerably better values.

Application Performance: 7-Zip

In the 7-Zip benchmark, we see a similar picture - the GA-7DXR ranks last along with the EpoX board, closely following the MSI K7 Master.

AGP Performance: Final Reality Benchmark

The Gigabyte board shows excellent AGP performance, ranking first and second with the Geforce 4 Ti and Voodoo 5, respectively.

AGP and PCI Performance: 3DMark 2000 and ATTO

3DMark 2000 as a whole is very focused on TnL and is by far not as interesting for retro-hardware comparisons as its predecessor. Its “High Polygon Count, 1 Light” test, however, is another good way to measure the AGP performance. In opposite to the Final Reality test, the general system performance is also somewhat of importance. The benchmark was executed with the Geforce 4 Ti installed.

To measure PCI performance, I installed a Windows 98SE compatible SATA controller with a Samsung PM871 128GB SSD connected into the system. For the bench, I chose 1024 to 4096 KB block size and picked the overall best values for the read and write throughput. This test will show, which maximum performance can be expected with fast storage options like SATA or SCSI and maybe gives a hint, if the chipset might be good for Voodoo 2 cards.

Another first place for the GA-7DXR, with the highest score in the 3DMark2000 sub-test. The PCI throughput is also excellent, with the highest read rates measured (along with the Asus A7M266), as well as the third highest write rates.

Storage Performance: HDTach

To measure the performance of the board's IDE and (if available) onboard IDE RAID solutions' performance, I benched one of the latest and fastest IDE drives (the Hitachi Deskstar T7K500 500GB) with the HDTach benchmark. I also tried a much more “recent” drive (the Western Digital Blue Edition 500GB), which should be even faster in theory, but the Hitachi drive produced much better results in this test.

Judging from the results, it seems like the GA-7DXR is limited to UDMA66, although the VIA southbridge provides an UDMA100 interface for IDE. But Gigabyte is not alone with this, the boards from EpoX and Abit show the same behaviour.

The performance of Gigabyte's Promise RAID chip is decent, giving the GA-7DXR the overall fastest IDE-based storage option among the boards tested.

Gaming Benchmarks

Now that we got all the theoretical performance numbers, let's see how the contenders perform in 3D gaming benchmarks.

3D Performance: 3DMark99max

3DMark99max was released in early 1999 and comes without support for Hardware TnL. The maximum supported (hardware-) DirectX level is DX6. It is a great benchmark to reveal good overall system performance, as it rewards good memory bandwidth and latency more than the slight clockspeed advantage, that some boards have because of their factory-overclocked FSBs.

  • Version: "latest"
  • Settings: standard

Another good performance of the GA-7DXR with both the GeForce 4 Ti and the Voodoo 5 5500. With the nVidia card, the Gigabyte board ranks third with the Asus A7M266 50 points ahead. With the 3dfx card installed, it even takes second place, leaving the Asus board behind by around 20 points.

While the scores for the Voodoo 2 SLI run of 3DMark99max are not far apart, the GA-7DXR comes in last place and is somewhat lagging behind the rest of the boards. The results of the first and fourth place boards are only about 30 points apart, but Gigabyte's board is more than 40 points behind the K7 Master, which ranks fourth.

The CPU score is around 90 points short of the EpoX 8K7A, which is a bit disappointing, considering the slightly tighter memory timings of Gigabyte's board.

3D Performance: Unreal Tournament (UT99) Timedemo(s)

Unreal Tournament (UT99) was released in November 1999 and is notorious for its hunger for CPU power. I chose to use two different timedemos for comparison, of which the utbench.dem timedemo is heavily CPU bound and therefore qualifies to measure the general performance of the boards. The second timedemo benchmark.dem is as GPU limited as possible in this game. This will reveal, how much impact a faster board can still have in more GPU limited situations. This game is also perfect to show, on which chipsets and boards Voodoo 2 cards run best.

  • Version: 4.36
  • Settings: High, Min desired Framerate "0", Show Decals [x], Use Dynamic Lightning [x]
  • Geforce: D3D
  • Voodoo 2 and Voodoo 5: Glide

In the utbench timedemo, the GA-7DXR ranks second to last with only around 0,5 FPS behind the first-placed Asus A7M266, as the results are very close here.

The results in the second timedemo are a bit further apart since this is a more GPU-heavy scenario. The GA-7DXR does well here and manages to push ahead of the MSI K7 Master, coming close to the second-placed Asus A7M266.

With the Voodoo 5 installed, the utbench results are even closer. The GA-7DXR is in third place here together with the 8K7A, with a slight advantage in minimum FPS over the EpoX board. In the benchmark.dem timedemo, place one through four are extremely close in terms of average framerate, the differences can rather be found in the achieved minimum framerate. The Gigabyte board performs outstanding here, with the second highest average framerate and a minimum framerate just under 60 FPS, which is around 10% faster than the second fastest board in that respect.

The average framerates in the utbench timedemo are only about 0,5 FPS apart, so the main difference lies once again in the minimum FPS. The GA-7DXR shows the lowest values here, with, to be fair, at least the A7M266 and the K7 Master being only slightly faster.

In the benchmark.dem timedemo, it ranks third in this regard with around 27 FPS. In terms of average framerate, all boards basically show the same performance.

3D Performance: Quake III Arena Timedemo

Quake 3 Arena was released shortly after Unreal Tournament, in December of 1999. It is known to reward fast memory latency and with its normal preset, it is completely CPU limited; at least for the GeForce 4 and the Voodoo 5. The Voodoo 2 SLI cards clearly limit the Athlon 1200 here, as the timedemo will show.

  • Version: 1.32
  • Settings: “Normal” Preset, only resolution changed to 1024x768x16
  • Geforce 5 and Voodoo5: OpenGL
  • Voodoo 2: “Voodoo” Renderer (miniGL)

The GA-7DXR performs around the level of the EpoX 8K7A and MSI's K7 Master with both the Geforce 4 Ti and the Voodoo 5, taking third place with either of the cards installed.

The Voodoo 2 SLI setup clearly limits here. All boards score the same FPS, with only the Abit KG7-RAID a close 0,1 FPS behind.

Summary & Rating

Gigabyte GA-7DXR (AMD761)
  • Layout
  • Features
  • Overclocking Options
  • Compatibility
  • Documentation & Support
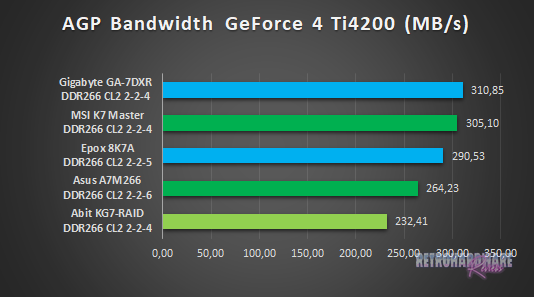
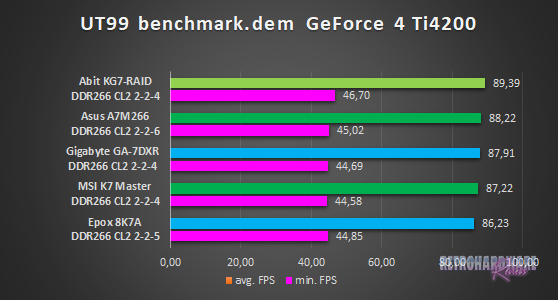
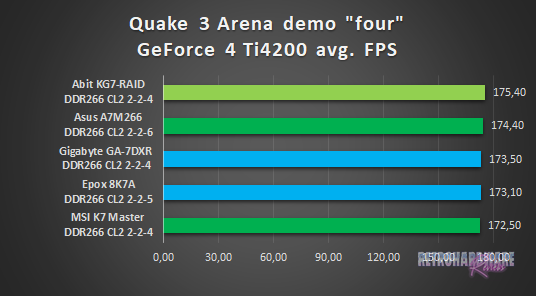
  • Performance: GeForce 4 Ti 4200
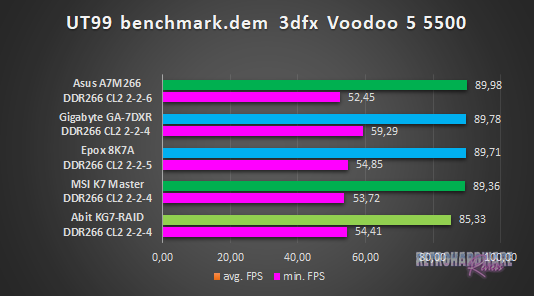
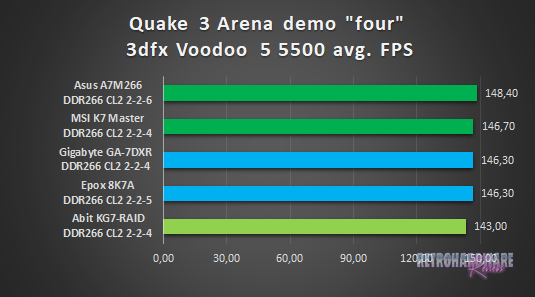
  • Performance: Voodoo 5 5500
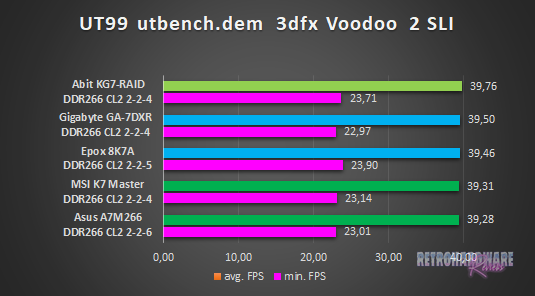
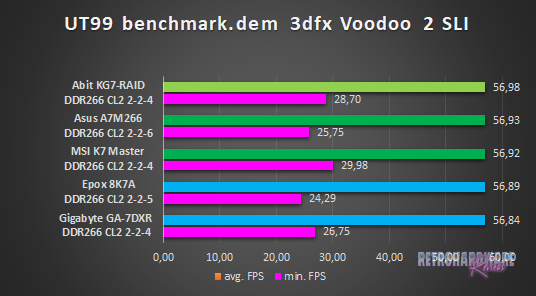
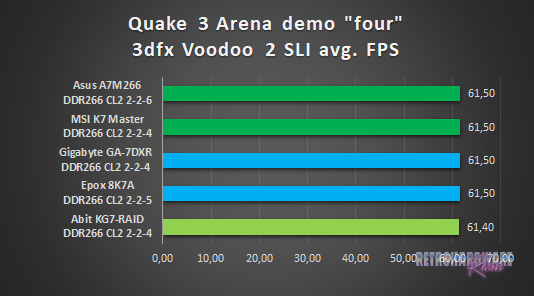
  • Performance: Voodoo 2 SLI
3.6

OVERALL

Pros Cons
+ Great CPU support – Time-consuming initial setup
+ Good performance – Confusing OC options
+ DUAL BIOS – Confusing and contradictory documentation
+ Creative audio chip – Location of ATX power connector
Bookmark the permalink.

Leave a Reply

Your email address will not be published. Required fields are marked *