Review: Soyo K7V Dragon Plus!

D - DDR
R - RAID
A - 6-channel Audio
G - AGP Pro
O - Overclocking
N - Networking


The K7V Dragon Plus! was the second Socket A board by Soyo to carry this name. It follows the original K7V Dragon, which is very similar in features and layout, but uses the older VIA KT266 chipset.

I received my board complete-in-box with an almost complete set of accessories, with only the Bonus Software Disk and the “Mighty Bolt” Smartcard missing. The pre-owner replaced all (!) capacitors of the board, unfortunately the replacement parts weren't entirely correct and I experienced serious issues with PCI expansion cards. After a lot of research for the original capacitor types, I found out that all caps below 1000 µF were replaced with low ESR types, whereas originally these were general purpose capacitors. After I replaced them with similar-to-original specced caps, I was finally able to complete this review. But more on that later 😉

Specifications and Features

Chipset:

  • VIA KT266A (VT8366A) Northbridge
  • VIA VT8233 Southbridge

CPU Support (with latest BIOS):

  • Athlon Thunderbird (ALL)
  • Athlon XP Palomino (ALL)
  • Duron Spitfire (ALL)
  • Duron Morgan (ALL)
  • Duron Applebred (/w BIOS 2BA9, which is only for the Applebred)

Memory Support:

  • 3 DDR DIMM slots, up to 3GB total

Expansion Slots:

  • 1x AGP Pro slot (1,5 / 3,3V) up to 4x
  • 5x PCI slots

Connectors (internal):

  • 2x IDE (UDMA100)
  • 2x IDE RAID (UDMA100)
  • 1x Floppy
  • 4x USB 1.1
  • 5x 3-pin fan connectors total (2x CPU, 2x chassis, 1x northbridge)

Connectors (external):

  • 2x PS/2
  • 1x RJ-45 10/100 Ethernet
  • 2x COM/RS-232
  • 1x Parallel Port
  • 2x USB 1.1
  • 3x 3,5" Audio Jacks (Line-Out, Line-In, Mic)
  • Gameport
  • 2x 3,5" Audio Jacks (Center/Bass, Rear R/L) (via SY-AUDIO01 backplane)
  • Optical Audio In/Out (via SY-AUDIO01 backplane)
  • Coax Audio In/Out (via SY-AUDIO01 backplane)


While the audio section of the K7V Dragon Plus! offers a lot of connectors and 5.1 surround support, I still won't cover it in the review. Unless you specifically need the digital output of the onboard solution, I think there are far better classic soundcards available for little money. Very commonly recommended are the Creative Soundblaster Live! cards for example, which offer fantastic compatibility with our beloved old games and sound far better than any onboard solution of that era.

In general, also don't list (from a retro-gamers perspective) useless connectors and features like IR, Smartcard- or Wake-on-LAN connectors and so on. But since I got my board with a good set of accessories, which includes a Smartcard reader, I will mention it briefly.

The K7V Dragon Plus! originally came with a 3,5" Smartcard reader, which also includes two front USB ports. On the bundled driver disk, there is a software to read and write data to SIM cards (Phonebook edit, change PIN etc.) as well as the “Magic Bolt” software, which supposedly enables you to store a password on the (originally) bundled Smartcard, which could be used to start (and/or boot) your PC.

Unfortunately, this software / Smartcard combination isn't mentioned anywhere in the manual. Because of this and because I don't have the said card here, I can't tell you more on this topic. But I must say I quite like the idea of it, from a nerd point of view 😉

Overclocking Features:

  • Adjustable Multiplier (BIOS) from x6 to x14*
  • Adjustable FSB (BIOS) from 100 to 233 MHz in 1 MHz steps
  • Adjustable VCore (BIOS) from +- 0,100 V in 0,025 V steps

*The selectable multiplier depends on the installed CPU


Documentation, Downloads, Drivers

Soyo is one of many motherboard manufacturers, that isn't around anymore for a very long time. Soyo Computer Inc. ceased the production of electronics in 2005, the european distribution was already closed in 2004. In 2009, the parent company Soyo Group Inc. also went bankrupt and closed doors.

Since the Soyo website is down for far more than ten years now, BIOS files, documentation and drivers have to be collected from across the net. This is definitely a lot less convenient than to obtain files for a motherboard of a still existing brand, but it can still be done without too much hassle.

In terms of BIOS downloads, you can obtain all but the three latest versions from here: https://www.elhvb.com/mobokive/archive/Soyo/bios/686/index.html

Just hit Ctrl+F on your keyboard and search for kvxa2. The three latest versions can be found with the same search string here: https://www.elhvb.com/mobokive/archive/Soyo/bios/k7/index.html

Please note, that the latest version (2BA9) is marked for Applebred CPUs only by Soyo - for all other CPUs, you can use version 2BA8.

The manual for the K7V Dragon Plus! is available for download here: https://manualzz.com/doc/6965561/soyo-sy-k7v-dragon-plus-user-manual

The manual itself (I have the physical copy) is rather thick and seemingly extensive, but literally more than half of the pages are descriptions of driver installations, audio (software) options and around 60 pages (!) describing everything humanly imagineable regarding the promise RAID controller and RAID modes themselves. The remaining (technical) info is only average at best. There is no INT routing table, the Magic Bolt software and the associated Smartcard(/-reader) is nowhere to be mentioned, and the available BIOS options are only described, not explained.

Regarding CPU support, this is the best spot to look for it: https://www.cpu-upgrade.com/mb-Soyo/index.html

Unfortunately, for the K7V Dragon Plus! in particular, the info seems incomplete. The Applebred is supported with the latest BIOS version, but Soyo's changelogs do not state which model(s). The BIOS changelog in general is pretty “cryptic”, the last model explicitely mentioned is the XP 2100+, which is supported since version 2BA3 already. In the release notes of version 2BA8, the support for a “AMD Low power CPU” is mentioned. Since the latest BIOS version 2BA9 only supports the Duron Applebred CPUs, the other listed CPUs on that site should be accurate for BIOS version 2BA3 to 2BA8.

To obtain drivers, take a look at this site: https://soggi.org/drivers/drivers.htm
It offers driver downloads for a huge share of old chips (network, storage, chipset, etc.). For the Promise RAID , I recommend downloading the latest driver from the manufacturer's website: https://www.promise.com/Support/downloadcenter

To sum it up: using a motherboard of a manufacturer that is not around anymore might not be as straightforward as using an Asus or Gigabyte motherboard, for example. Nevertheless, there are many former manufacturers of motherboards, that released very interesting products that are worth the time and effort. And Soyo is certainly one of them.

Design & Layout

Since the layout of the board is overall pretty decent, I want to start things off with a weak point, that the K7V Dragon Plus! shares with numerous other Socket A boards of that era. The ATX power connector is on the far left of the PCB, close to the rear I/O ports. This requires you to route the ATX power cable either above or below the CPU socket, with the former possibly being difficult on this particular board and the latter being a bad idea in general, as chipset cooling and system airflow in general would be negatively affected.

Although the CPU socket keeps enough distance to the top edge of the board to have the ATX power cable routed there, there are two huge capacitors in the way, that prevent the cable from being routed nice and low, so that it has to go over them. This can definitely be a problem in tight in-case situations and in combination with 80mm+ CPU coolers.

The available space around the CPU socket is not generous but should be sufficient for most coolers, including big ones. To the left side of the CPU socket, there are lots of big capacitors quite close to it, which can make the installation of big CPU coolers a bit fiddly, depending on the actual cooler.

I tested the following eight CPU coolers regarding compatibility:


  • Thermaltake Silent Boost K7
  • Cooler Master HHC-001
  • Swiftech MCX 370
  • Alpha PAL 6035
  • Alpha PAL 8045
  • Smartcooler 60mm
  • Arctic Cooling Copper Lite

At this point, it is worth mentioning, that the poly caps to the left of the CPU socket are 10mm lower than the original ones. This definitely helps with some coolers like the Arctic Copper Lite seen above, which probably wouldn't fit with the stock capacitors still in place. I had no problem either with the installation of all the other coolers using the standard clamp mounting mechanism. However, I cannot recommend to install coolers using the mounting holes for installation, like the Alpha PAL 8045.

There are lots small components very close to three out of the four mounting holes that might get damaged during installation. I won't say it is impossible to mount such a cooler without damaging the board, but I still wouldn't do it.

Moving on to system cooling, the K7V Dragon Plus! has a whopping total of five 3-pin fan connectors on offer, with one of them occupied by the chipset cooler. 2 connectors close to the CPU socket, which is great for the usage of some classic 2-fan coolers like the Kanie Hedgehog Wing for example. The remainig two connectors are perfectly placed for the connection of a front and a rear fan.

Another positive aspect of the layout is the position of the IDE, RAID and floppy connectors. These are all located on the right edge of the board, keeping a nice distance to the level of the AGP port, which itself leaves generous clearance to the memory slots, to ensure that the installation or removal of memory sticks doesn't require you to remove your graphics card.

While long PCI cards like Vodooo 2s for example make one of the RAID ports unusable when installed to PCI #2 and #3, I still think there is no better position on the board for these ports.

Overall, Soyo did a great job in placing all connectors close to the edge(s) of the board. This might be standard by today, but back then, those could be spread all over the board. The CMOS battery and the Clear CMOS jumper are also located pretty low, close to the right of the fifth PCI slot. With a small card like an Ethernet card, this no problem. A Voodoo 2 card, on the other hand, would have to be removed to replace the battery. But I consider this a minor issue, given the overall well done layout of the board.

Test-System and Parts

Baseline Setup:

  • CPU: AMD Athlon Thunderbird 1200C (FSB133)
    Because I want to compare 1st Gen Socket A mainboards to their DDR follow-ups I have to use a CPU, which is available in FSB100 and FSB133 versions with the same clockspeed. Since I sadly don't have a Thunderbird 1400 B at my disposal, I will use the Thunderbird 1200 for my reviews and comparisons of these boards, which I have in the “B” (FSB100) and “C” (FSB133) version.
  • RAM: 1x Corsair CMX512-3200C2 (XMS3202v4.2) = 512MB PC400 CL2
    This Corsair XMS stick should allow the tightest timings at 266 MHz DDR and its size of 512MB is the perfect choice for Windows 98SE.
  • VGA: MSI Geforce 4 TI4200-VTD8X
    To remove any GPU bottleneck for testing, I chose a Geforce 4 Ti as the primary graphics card for my test setups. The Geforce 4 Ti series are also known to pull a lot of power from the AGP port, so that possible problems in that department can also be revealed. It is also somewhat period correct and a good match for a high performance retro-machine that should be able to run late Windows 98SE games without any issues.
  • VGA2: 3dfx Voodoo 5 5500 AGP
    Many people consider the Voodoo 5 5500 the perfect card for (Win9x-) retro gaming. The Voodoo 5 benefits from a beefy setup, so a powerful Athlon Thunderbird or early Athlon XP is the perfect match for this card.
  • Audio: Creative Soundblaster Live! (SB0060)
    Creative's Soundblaster Live! can be found in many retro-machines. It offers great sound, perfect Win98SE compatibility and is still widely available for reasonable money. It was also known to cause problems with VIA-based 686B southbridges using old BIOS revisions and VIA chipset drivers. All this should be history at this point, but double checking on pontentially affected mainboards is still not a bad thing to do.
  • LAN: 3Com Etherlink XL PCI
    Just a good, reliable choice for networking. All legacy Windows versions all the way up from Win95 have built-in drivers for it, which is also a huge “plus”.
  • HDD: Western Digital WD200BB (20GB 7200RPM)
    No special intention behind this drive, it is just “there” and still works fine.


Additional Hardware for certain Tests:

  • Silicon Image Sil3512 SATA Controller & Samsung PM871 128GB SSD
    These two will help me measure the PCI bandwidth.
  • Hitachi Deskstar T7K500 (500GB 7200RPM)
    This drive will tell us, how big we can go with the onboard IDE connectors and how the performance is like.
  • 2x Voodoo 2 12MB (SLI)
    A pair of Voodoo 2s is a must have for any retro-machine, that doesn't feature a 3dfx card as the primary VGA solution. They offer compatibility to older Glide games and can be used with any more powerful primary graphics card. It is an important thing to know, how well these perform and if there are differences between all the available Socket A chipsets of that era or even between boards using the same chipset.


Drivers used:

  • Chipset: VIA Hyperion 4in1 4.56v
  • Geforce 4: nVidia Forceware 43.45
  • Voodoo 5: Amigamerlin 2.9
  • Voodoo 2: FastVoodoo 4.6
  • SB Live!: Some driver from my archive, not shure 😉
  • 3Com NIC: Windows 98SE preloaded driver
  • SATA Controller: Some driver from my archive, not shure 😉

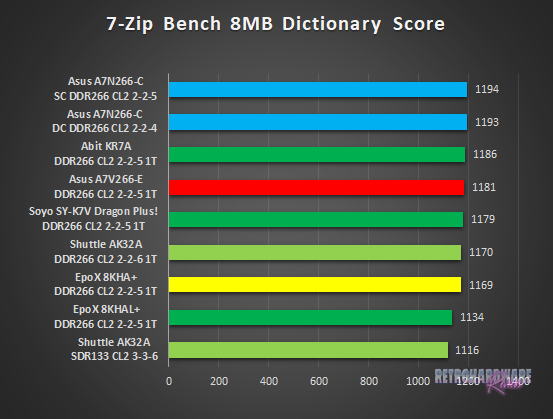
System Setup and Usage

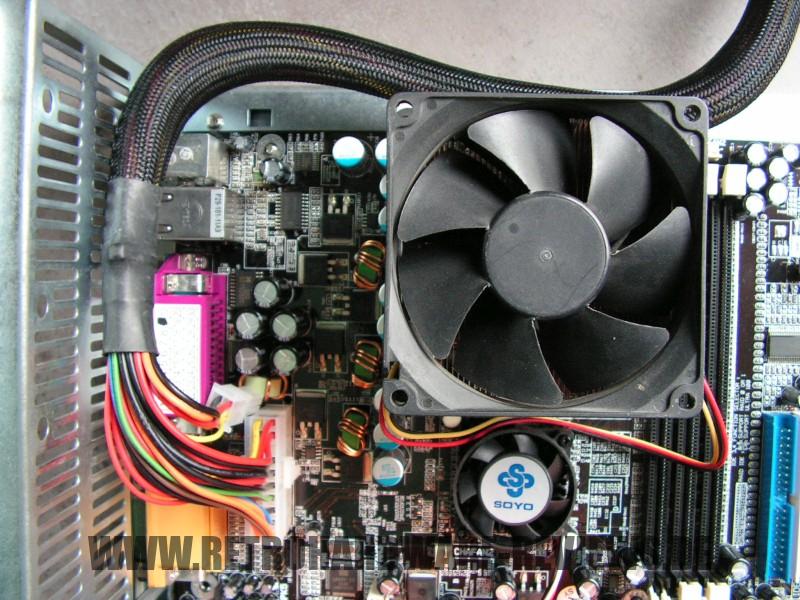
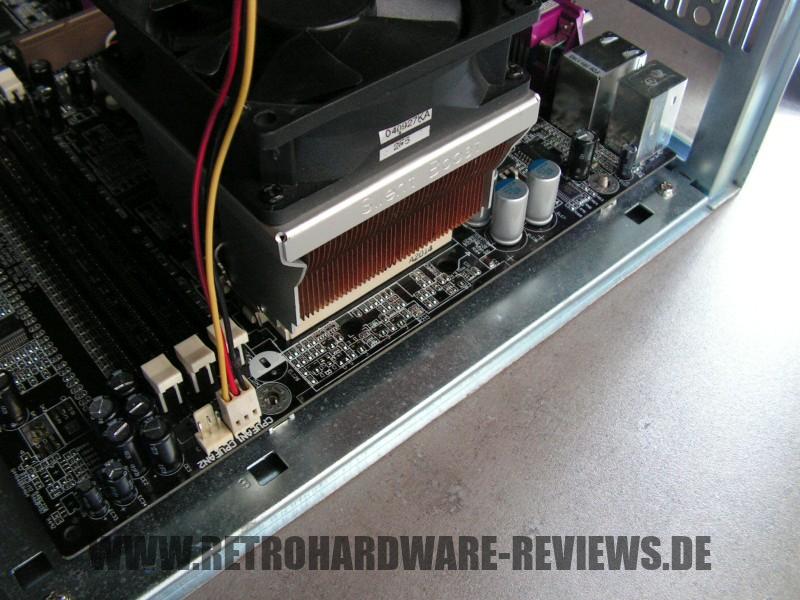
Like mentioned in the introduction, my K7V Dragon Plus! was completely recapped before I got it. Initially everything seemed fine - I installed CPU, memory and a graphics card and the board started without a problem. I went into the BIOS, configured it to best performance and set the memory timings to the fastest possible options (CL2 2-2-5 1T). Since I didn't find an INT routing table in the manual, my next step was to determine the INT assignment of the onboard devices and PCI slots.

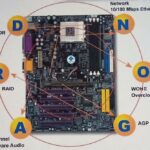
Under PnP/PCI Configurations in the BIOS, you can check the assignment of the onboard devices, which looks like this:

  • INT-A: AGP, onboard audio, onboard NIC
  • INT-B: RAID controller
  • INT-C: free
  • INT-D: 2x USB controller


Now that is a strange configuration. In general, you want to keep the video card away from sharing IRQs with other devices and Soyo configured the board to have the AGP, onboard audio and onboard NIC use the same INT line. I find this to be a rather bad design, the onboard audio should have better been connected to INT-D in my opinion, sharing its IRQ with the USB controllers. Anyway - with this information gathered, I plugged in my 3Com NIC in one PCI slot after the other, to find out to which INT line they are connected. This is the result:

  • PCI #1: INT-A, sharing with AGP, onboard audio, onboard NIC
  • PCI #2: INT-B, sharing with RAID controller
  • PCI #3: INT-C, no sharing
  • PCI #4: INT-D, sharing with USB controllers
  • PCI #5: INT-A, sharing with AGP, onboard audio, onboard NIC


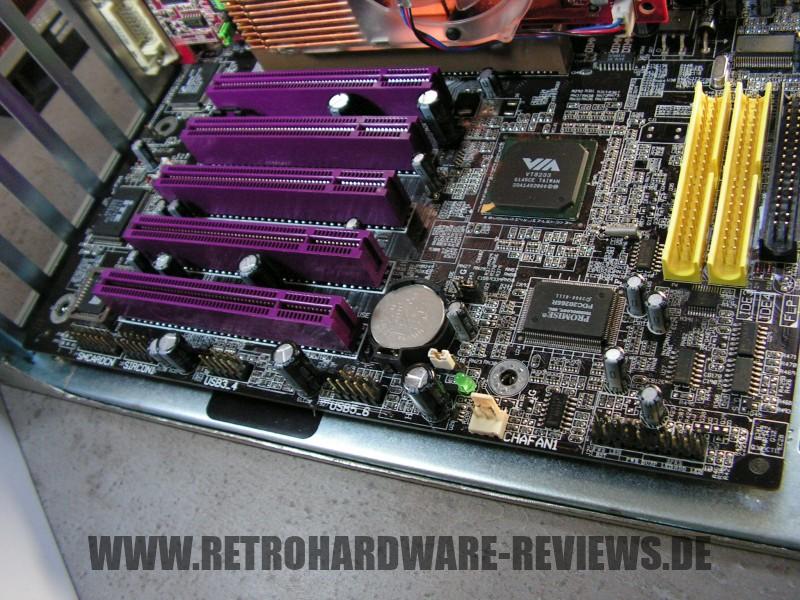
Again, strange decision here. Why is PCI #5 not connected to INT-C, where no onboard device and only one PCI slot is connected to? INT-A is the worst possible decision and makes the fifth PCI slot almost unusable (in theory). Based on this information, I figured the following would be the best possible configuration for the test-setup (with onboard audio and RAID controller disabled):

  • PCI1 free
  • PCI2 (SATA controller)
  • PCI3 SB Live!
  • PCI4 Voodoo 2
  • PCI5 Voodoo 2


I initially decided to use the onboard NIC, so I don't have to swap expansion cards to much during testing. For the first boot after restoring my pre-configured Windows image, I had my usual 3Com NIC temporarily installed in PCI #2, to copy the drivers for the onboard VIA NIC to the second partition. The system booted fine and everything worked as expected. Windows detected the “new hardware” (including the 3Com NIC, for which Windows comes with pre-loaded drivers) and asked for a reboot after the installation. After this, a marathon of problems began.

Upon next reboot, the system got stuck. At this time, the Promise controller, which is sharing its IRQ with PCI #2, was still enabled. Although its driver wasn't installed yet, I suspected this to be the problem and disabled it in the BIOS. But Windows gut stuck again during the next boot.

The next thing I did, was to remove the SB Live! from PCI #3, to install the 3Com card there. This time the system booted all the way through, but during the installation of the network card, I got a complete freeze and had to reset the system. Windows booted fine the next time and no new hardware was detected this time. I quickly checked the device manager, to discover the 3Com NIC to be listed with an exclamation mark. In the property of the device I discovered that “the device was disabled because the system stopped responding”. I tried to re-enable it, but it got disabled again automatically on every reboot.

I went into the BIOS afterwards and disabled the “PCI Post Write” option, as this can cause trouble with some PCI cards on certain systems, but the system kept behaving like before. I finally removed the card, installed the Soundblaster again and loaded the driver for the onboard Ethernet card from an USB drive. The VIA chip installed fine and was operational right away upon next boot.

The following driver installations of chipset and graphics card went without issue, but when I installed the SB Live!, the system froze again during the installation. To make things shorter: this happened with the card being installed in PCI #2, #3 und #4. Sometimes during installation, sometimes after the first reboot, directly after the Windows logon.

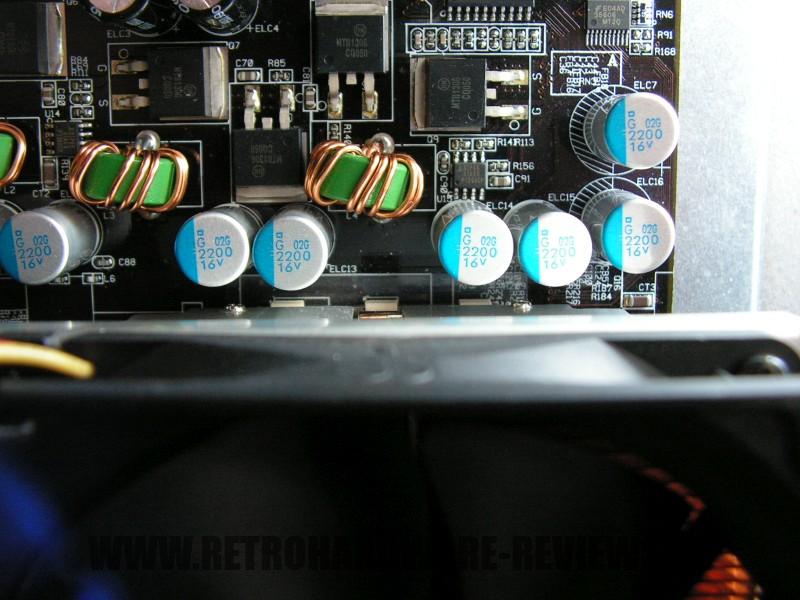
I also tried several BIOS versions, BIOS defaults and what not, the behaviour did not change. Apart from the problems with the PCI cards, the board worked perfectly fine, however. I did several stress tests, as well all my usual benchmarks that do not require audio and did not experience a single instability. My suspection was, that the original capacitors may not have been replaced with entirely suitable spare parts, but the seller couldn't tell me which caps originally were on there. So I seeked help in several forums to determine the original parts and suitable replacements for them.

This was not an easy task, since these Soyo boards are not that common (at least here in germany) and it took me several weeks to finally get all the information, the new capacitors and the board repaired. I want to give thanks to all the people that helped me with this, but especially to

  • Grindhavoc (voodooalert.de) for providing me with a Soyo KT333 Dragon Ultra Platinum to create a list of capacitors (this one has a very similar layout for the most part and got me on the right track for the replacement caps)
  • Wild_Bill (voodooalert.de) for finally providing me with a list of the original caps of the exact same board
  • Stangelator and WMDK (hardwareluxx.de) for their help in finding the correct replacement caps


With the board now properly restored, I hoped for no further troubles - but this was unfortunately not the case. With my initially planned setup, which was this (as a reminder):

  • PCI1 free
  • PCI2 free (Promise controller disabled and SATA card removed, since I completed those tests before)
  • PCI3 SB Live!
  • PCI4 Voodoo 2
  • PCI5 Voodoo 2


..the system froze after the windows logon, like it did before. With the SB Live! in the second PCI slot, the behaviour was the same. I then removed the card to install and test the 3Com NIC, which also caused problems before. And fortunately, this one actually worked in every PCI slot (except PCI #1, which I didn't test). A this point, I decided to test the onboard audio first, to rule out an incompatibility with the SB Live! card. I also restored a fresh Windows image, to not have Creative drivers and/or software cause problems while doing so.

With this configuration, I was able to install all drivers (chipset, VGA, onboard NIC) without issues and installed the C-Media audio drivers last. The installation completed and I got the Windows logon sound, but after this, the system partially froze. I was able to move the mouse, but everything else stopped responding. The same thing happened on every reboot until I disabled the onboard audio chip again to install the Soundblaster card.

And to my great delight (not!), the system froze during its installation just as it did with the old windows image, with the card in both PCI #2 and PCI #3. As a final act of desperation, I installed it to PCI #4, where its installation actually ran all the way through and the SB Live! really worked after the subsequent reboot. I was (pleasently) suprised to say the least, and after some reboots and some quick game tests, everything appeared to be working correctly. For the actual benchmarking (which I almost did not believe would ever happen), I had to re-arrange my the expansion card setup, which ended up looking like this:

  • PCI1 free
  • PCI2 Voodoo 2
  • PCI3 Voodoo 2
  • PCI4 SB Live!
  • PCI5 3Com NIC


Thankfully, this setup proved to be issue free finally and I was able to complete all remaining benchmarks.

I must say I am quite perplexed, that the Soundblaster Live! card caused so much trouble on this board. The replacement capacitors should be completely accurate by now and all other PCI cards also work without abnormalities. In theory, the SB Live! should work better in PCI #2 or #3, because there are no other (enabled) devices on INT-B and INT-C. On INT-D / PCI #4, it is sharing its IRQ with the USB controllers. My best guess is, that maybe the secondary INT line connections on PCI #2 and #3 are on INT-A, which would mean, the secondary IRQ of the SB Live! (which the card needs/allocates for the SB16 emulation device) would be shared with the video card. This is something an INT routing table could shed some light on, but unfortunately there is none existing.

The other thing is the problem I experienced with the onboard audio. Soyo's decision to have the audio chip sharing its IRQ with the graphics card could be the troublemaker here. Possible aspects can be the video card and/or driver version, BIOS version, audio driver version etc. Different combinations of these aspects may produce working or troublesome configurations, but that is nothing that I want to dive deeper into, to be honest. For now, I am happy that the board is finally working.

Benchmarks

Synthetic Measurements

Before we get into the 3DMark and gaming benchmarks, let's have a look at some theoretical numbers. These synthetic tests will exhibit the differences between the several chipsets and boards better than any game benchmark and provide us with "background information" that might be of use in understanding the timedemo results later.


Memory Performance: AIDA64 Cache & Memory Benchmark

The Soyo board shares the lead with Abit's KR7A in the Memory Bandwith bench here. The KT266A based boards (with the exception of the Epox 8KHAL+) perform very similarly, but it is noteworthy, that the Dragon and the KR7A perform best despite having a slight clockspeed disadvantage compared to most of the competition.

In the Memory Latency bench, the K7V Dragon Plus performs solid and has the second lowest memory latency among the KT266A contenders, only bested by the KR7A and the nForce-based Asus A7N266-C.

Application Performance: 7-Zip

In the 7-Zip Benchmark, Soyo's board lands in the middle of the testfield. It only scores two points less than the A7V266-E, which has around 9 MHz advantage in clockspeed.

AGP Performance: Final Reality Benchmark

With around 324 MB/s, the Dragon Plus! shows the highest AGP bandwidth in combination with the GeForce 4 Ti4200. With the Voodoo 5 5500 installed, it falls behind most competitors. But still, it is less than 10 MB/s behind the top entry, so nothing to worry about.

AGP and PCI Performance: 3DMark 2000 and ATTO


3DMark 2000 as a whole is very focused on TnL and is by far not as interesting for retro-hardware comparisons as its predecessor. Its “High Polygon Count, 1 Light” test, however, is another good way to measure the AGP performance. In opposite to the Final Reality test, the general system performance is also somewhat of importance. The benchmark was executed with the Geforce 4 Ti installed.

To measure PCI performance, I installed a Windows 98SE compatible SATA controller with a Samsung PM871 128GB SSD connected into the system. For the bench, I chose 1024 to 4096 KB block size and picked the overall best values for the read and write throughput. This test will show, which maximum performance can be expected with fast storage options like SATA or SCSI and maybe gives a hint, if the chipset might be good for Voodoo 2 cards.

Another first place for the Soyo board. The good system performance it showed before in combination with its excellent AGP bandwidth with the GeForce 4 Ti4200 installed lead to the highest score in this 3DMark 2000 sub-test.

The PCI bandwith test, however, produced mixed results. 78 MB/s read performance is nothing to write home about, but quite solid. 51 MB/s write performance, on the other hand, is rather poor. Abit and Asus clearly prove, that KT266A based boards can do a lot better in this department.

Storage Performance: HDTach


To measure the performance of the board's IDE and (if available) onboard IDE RAID solutions' performance, I benched one of the latest and fastest IDE drives (the Hitachi Deskstar T7K500 500GB) with the HDTach benchmark. I also tried a much more “recent” drive (the Western Digital Blue Edition 500GB), which should be even faster in theory, but the Hitachi drive produced much better results in this test.

All boards perform very similar with the harddisk connected to the chipsets' IDE ports. All KT266A based boards with the older VT8233 southbridge reach exactly (or almost, in case of the Abit KR7A) 78 MB/s, the nForce-based Asus A7N266-C is on a similar level with 78,4 MB/s. Only the Epox 8KHAL+ with the newer VIA VT8233A southbridge squeezes more than 80 MB/s out of the drive.

Soyo's onboard Promise IDE RAID chip is actually a little slower than the chipsets' IDE ports, with 75,9 MB/s read speed. The Highpoint RAID chip of Abit's K7RA is a tiny bit faster, but still behind all chipset-supplied IDE connectors.

Gaming Benchmarks

Now that we got all the theoretical performance numbers, let's see how the contenders perform in 3D gaming benchmarks.


3D Performance: 3DMark99max

3DMark99max was released in early 1999 and comes without support for Hardware TnL. The maximum supported (hardware-) DirectX level is DX6. It is a great benchmark to reveal good overall system performance, as it rewards good memory bandwidth and latency more than the slight clockspeed advantage, that some boards have because of their factory-overclocked FSBs.

  • Version: "latest"
  • Settings: standard

The K7V Dragon Plus! takes the third place with both the GeForce 4 and Voodoo 5 installed.  Most of the boards show pretty similar performance in both cases. The slightly lower AGP throughput (as seen in the Final Reality AGP Test) in combination with the Voodoo 5 seems not to affect the board's actual performance at all.

The pair of Voodoo 2 cards seem to run equally well on all KT266A based boards, as the results show very little variance.

3DMarks' CPU Score results are a little more interesting, as the Soyo board scores higher than all but one KT266A based boards, despite the slight disadvantage in clockspeed it has to most of them. Only Abit's KR7A and the nForce based Asus A7N266-C are faster.

3D Performance: Unreal Tournament (UT99) Timedemo(s)


Unreal Tournament (UT99) was released in November 1999 and is notorious for its hunger for CPU power. I chose to use two different timedemos for comparison, of which the utbench.dem timedemo is heavily CPU bound and therefore qualifies to measure the general performance of the boards. The second timedemo benchmark.dem is as GPU limited as possible in this game. This will reveal, how much impact a faster board can still have in more GPU limited situations. This game is also perfect to show, on which chipsets and boards Voodoo 2 cards run best.

  • Version: 4.36
  • Settings: High, Min desired Framerate "0", Show Decals [x], Use Dynamic Lightning [x]
  • Geforce: D3D
  • Voodoo 2 and Voodoo 5: Glide

The CPU bound utbench.dem timedemo has the boards scoring fairly identical with few exceptions. The K7V Dragon Plus! reaches third place, as it does in the second timedemo. While the results of the benchmark.dem timedemo seem to be very close to each other too at first glance, the top three boards can seperate themselves from the rest of the test field on a closer look. The Dragon Plus! is one of three boards to have more than 93 FPS on average and shows a strong performance.

The Dragon Plus! performs on par with the fastest KT266A boards in the utbench timedemo and has the highest minimum FPS among the boards tested, which is a great result. In the more GPU limited benchmark.dem timedemo, all the boards in this test perform virtually identical.

The results with the Voodoo 2 cards installed are very close together in both timedemos. The Soyo board places fifth and third here, but the performance is very similar to the respective first placed boards.

3D Performance: Quake III Arena Timedemo


Quake 3 Arena was released shortly after Unreal Tournament, in December of 1999. It is known to reward fast memory latency and with its normal preset, it is completely CPU limited; at least for the GeForce 4 and the Voodoo 5. The Voodoo 2 SLI cards clearly limit the Athlon 1200 here, as the timedemo will show.

  • Version: 1.32
  • Settings: “Normal” Preset, only resolution changed to 1024x768x16
  • Geforce 5 and Voodoo5: OpenGL
  • Voodoo 2: “Voodoo” Renderer (miniGL)


In Quake III Arena, we see very close results again. With both the GeForce 4 and the Voodoo 5 installed, most boards are less than 1 FPS apart.

The Voodoo 2 SLI setup clearly limits here. All KT266A based boards score the same FPS, the nForce board is also just 0,1 FPS behind.

Summary & Rating

Soyo K7V Dragon Plus! (VIA KT266A)
  • Layout
  • Features
  • Overclocking Options
  • Compatibility
  • Documentation & Support
  • Performance: GeForce 4 Ti 4200
  • Performance: Voodoo 5 5500
  • Performance: Voodoo 2 SLI
3.9

OVERALL

Pros Cons
+ Great layout – CPU Support only average
+ Great performance – Rather bad documentation
+ Lots of fan connectors – CPU cooler compatibility (through-hole mounting)
+ Lots of features and “gimmicks”
Bookmark the permalink.

Leave a Reply

Please use a Nickname for privacy.