Review: Asus A7V266-E

Introduction

The first Socket A mainboard we will take a look upon, is the Asus A7V266-E. This board was relatively common among VIA KT266A based motherboards and generally highly regarded. There are 4 models of the A7V266 (in ATX format) out there, which differentiate as follows:

  • A7V266
    First Edition, based on the older KT266 chipset
  • A7V266-E
    Follow-up with the newer KT266A chipset, the PCB remains unchanged
  • A7V266-EX
    KT266A with newer VT8233A southbridge, which offers ATA133 over ATA100 of the older VT8233 southbridge; chipset is now passively cooled, new "Overvoltage" jumper, DIP switch for Multiplier removed
  • A7V266-C
    LowCost Version auf the -EX, features the new southbridge, lacks some things as for example the Asus iPanel connector, RAID and the CNR connector

A7V266, A7V266-E and A7V266-EX can be had with or without onboard RAID (naming stays the same), the -C version always lacks onboard RAID.

To make matters more complicated: All (KT266A-)PCB Revisions below 2.00 should be -E. My A7V266-E is Revision 2.00, which should be the -EX. So it has the old VT8233 southbridge, but already features the new "Overvoltage" jumpers, which supply 2,11V VCore for overclocking. It also has the big passive heatsink of the -EX on the northbridge, versus the active cooling of the older revisions.

Gallery

Specifications and Features

Chipset:

  • VIA KT266A (VT8366A) Northbridge
  • VIA VT8233 Southbridge

CPU Support (with latest BIOS):

  • Athlon Thunderbird (ALL)
  • Athlon XP Palomino (ALL)
  • Athlon XP Thoroughbred (all FSB266 models up to 2600+)
  • Athlon XP Thorton (all FSB266 models up to 2400+)
  • Duron Spitfire (ALL)
  • Duron Morgan (ALL)
  • Duron Applebred (ALL)

Memory Support:

  • 3 DDR DIMM slots, up to 3GB total

Expansion Slots:

  • 1x AGP Pro slot
  • 5x PCI slots
  • 1x ACR slot

Connectors (internal):

  • 2x IDE (UDMA100)
  • 1x Floppy
  • 4x USB 1.1
  • Asus iPanel connector
  • 3x 3-pin fan connectors total (1x CPU + 2x chassis)

Connectors (external):

  • 2x PS/2
  • 2x COM/RS-232
  • 1x Parallel Port
  • 2x USB 1.1
  • 3x 3,5" Audio Jacks (Line-Out, Line-In, Mic)
  • Gameport


You might have noticed, that I didn't mention the audio chipset specifically, as I think far better solutions than the old onboard chipsets are readily available for little money.Very commonly recommended are the Creative Soundblaster Live! cards for example, which offer fantastic compatibility with our beloved old games and sound far better than any onboard solution of that era.

I also don't list (from a retro-gamers perspective) useless connectors and features like IR, Smartcard- or Wake-on-LAN connectors and so on.


Overclocking Features:

  • Adjustable Multiplier (BIOS) from x5 to x14
  • Adjustable FSB (BIOS) from 100 to 227 MHz in 1 MHz steps
  • Adjustable VCore (BIOS) from 1,750 V to 1,850 V in 0,025 V steps
  • Core Overvoltage (Jumper): +0,300V offset to any VCore setting configured in the BIOS
  • I/O Voltage (Jumper): 2,50 V / 2,65 V / 2,75 V / 2,80 V


Earlier board-revisions (below 2.xx) had an additional DIP switch on the PCB to adjust the multiplier manually, when the "Jumperfree Mode" is disabled. This DIP switch is missing in Rev. 2.00 and up boards but the table with settings is still present on the PCB.

There are also some jumpers, which in theory allow to adjust the VCore manually. These jumpers would allow to set the VCore slightly lower than the BIOS settings offer (1,675 or 1,700 V is the lowest setting, depending on the installed CPU), but that does not matter too much, as the settings get completely ignored in both jumper- and jumperfree mode. I don't understand why Asus did not integrate all VCore settings in the BIOS option in the first place, but.. yeah.

Overall, I think all this jumper-mess should have been removed completely. Especially those DIP switches and jumpers, that offer redundant settings. Taking into account that the A7V266-E(X) is a rather “late" board of the “FSB266 Socket A era”, this mixed DIP / jumper / BIOS approach seems outdated, especially in comparison to other boards of the time.

Documentation, Downloads, Drivers

Hardware and BIOS aside (for the moment) - the first big positive aspect when you chose a mainboard of a still existing manufacturer for your retro build, is, that you'll most likely won't have too much trouble finding documentation and BIOS files.

The Support Site for the A7V266-E can be found easily when you go to your search engine of choice and type "a7v266-e support".

Asus still offers the manual, the latest BIOS versions and even drivers for download.
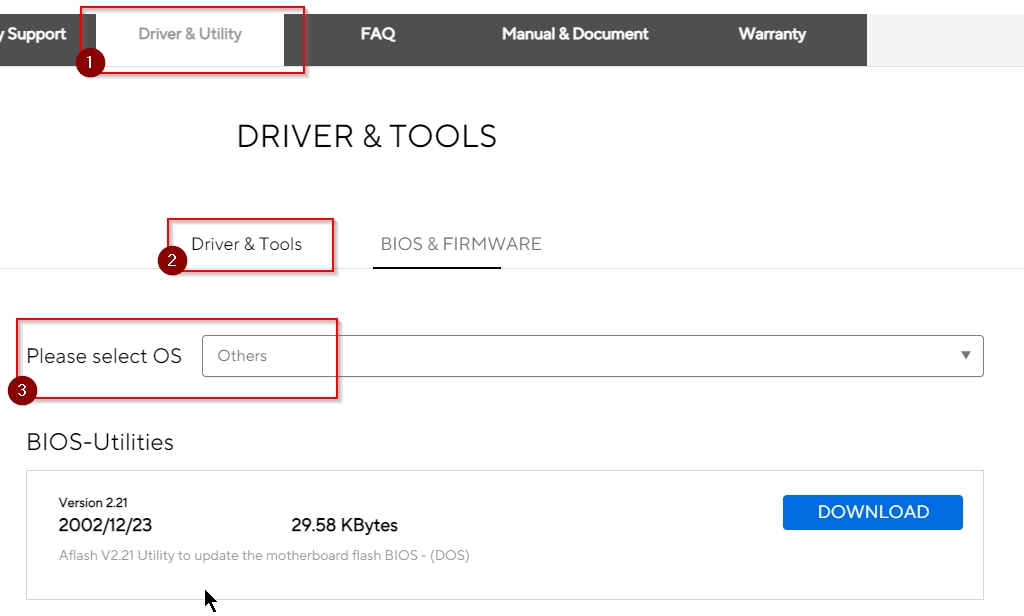
Unfortunately, Asus does not bundle a BIOS flash tool with the BIOS downloads, and the utility is also not available for download in the BIOS & Firmware download section of the support page. The required "Aflash" Utility can be found under Driver & Tools - there you have to select "Others" at the "Select OS" drop-down list:

There is a CPU Support list directly on the support page, but Asus also offers a global CPU Support search, where you're not only able to search for a specific mainboard model but also the other way round: If you have an old CPU laying around, you can use the search form to find compatible mainboard models and maybe to get inspiration for your next retro build.

You can find it here: https://www.asus.com/support/cpu_support

Design & Layout

When it comes to "design", there can only be subjective opinions. Some people might not even care about the look of an old motherboard at all. Well - I do 😉

Visually, I am not a big fan of the A7V266-E. It looks kind of boring, empty and just a little "odd" in a way.

Looking at the A7V266-E, it seems to me like the Asus engineers decided to grab a full-size ATX PCB, populate it with components from left to right, and when they reached the middle, they realized there was almost nothing left to install on the right third of the board. 😉

The memory slots are placed far towards the middle, very close to the CPU socket. The BIOS battery is also located very close to the PCI slots and the location of the Floppy connector is among the worst I have ever seen.

The odd(-looking) location of the memory slots at least results in some space between them and the AGP Port. For this reason, the memory modules can be installed and removed, while the graphics card is still installed (which is not self-evident for a mainboard of that era). The downside of this however, is the close proximity to the CPU socket. Even if you use a small CPU cooler, you'll have to remove the first memory stick when you replace the CPU or renew the thermal compound.

While the location of the memory slots might be understandable from a technical point of view (the distance to the northbridge has best to be kept small), the position of the Floppy connector and the BIOS battery are just a complete failure in my opinion.

Despite the very little space between the first memory slot and the CPU socket, most CPU coolers should fit without any issues. Apart from the memory slots, there is lots of space around the socket. I tested the following eight CPU coolers towards compatibility:

  • Thermaltake Silent Boost K7
  • Cooler Master HHC-001
  • Swiftech MCX 370
  • Alpha PAL 6035
  • Alpha PAL 8045
  • Smartcooler 60mm
  • Arctic Cooling Copper Lite

All of these coolers could be installed without a problem, although the Alpha PAL 8045 gets really close to the first memory module, especially if it has got a heatspreader installed.

The remaining layout is quite decent, if only the location of the most important connectors is concerned.

The position of the IDE connectors is perfect in my opinion, as they are located on the upper right half, at the edge of the PCB. This allows you to hide the IDE cables pretty well in most cases. The ATX power connector is also in the same spot, which is okay-ish, but I prefer to have it more towards the top edge of the PCB.

There are two usable 3-pin fan connectors, which is sufficient for most systems. They are also placed quite good for the usage of a fan in the front and in the back of the case.

Asus also did a relatively good job in printing markings and tables onto the PCB, so that all important settings for DIP switches and jumpers can be found without looking them up in the manual. This is also true for the front panel connectors. But like I mentioned earlier - it would have been even nicer, if a good share of jumpers and DIPs would just not be there in the first place, because most of them offer redundant settings to those configurable in “Jumperfree Mode” from within the BIOS.

One important missing info (on the PCB imprints) is, that the “JEN” jumper has to be set to 2-3 to enable the “Jumperfree Mode”. And this the most important information of all in my opinion. Although this is the default setting according to the manual, many things can happen in 20+ years, and if all DIP switches are set correctly to “Jumperfree" but the “JEN” jumper was changed to 1-2 over the years, one might wonder why there are missing settings in the BIOS or why the system won't even boot.

Test-System and Parts

Baseline Setup:

  • CPU: AMD Athlon Thunderbird 1200C (FSB133)
    Because I want to compare 1st Gen Socket A mainboards to their DDR follow-ups I have to use a CPU, which is available in FSB100 and FSB133 versions with the same clockspeed. Since I sadly don't have a Thunderbird 1400 B at my disposal, I will use the Thunderbird 1200 for my reviews and comparisons of these boards, which I have in the “B” (FSB100) and “C” (FSB133) version.
  • RAM: 1x Corsair CMX512-3200C2 (XMS3202v4.2) = 512MB PC400 CL2
    This Corsair XMS stick should allow the tightest timings at 266 MHz DDR and its size of 512MB is the perfect choice for Windows 98SE.
  • VGA: MSI Geforce 4 TI4200-VTD8X
    To remove any GPU bottleneck for testing, I chose a Geforce 4 Ti as the primary graphics card for my test setups. The Geforce 4 Ti series are also known to pull a lot of power from the AGP port, so that possible problems in that department can also be revealed. It is also somewhat period correct and a good match for a high performance retro-machine that should be able to run late Windows 98SE games without any issues.
  • VGA2: 3dfx Voodoo 5 5500 AGP
    Many people consider the Voodoo 5 5500 the perfect card for (Win9x-) retro gaming. The Voodoo 5 benefits from a beefy setup, so a powerful Athlon Thunderbird or early Athlon XP is the perfect match for this card.
  • Audio: Creative Soundblaster Live! (SB0060)
    Creative's Soundblaster Live! can be found in many retro-machines. It offers great sound, perfect Win98SE compatibility and is still widely available for reasonable money. It was also known to cause problems with VIA-based 686B southbridges using old BIOS revisions and VIA chipset drivers. All this should be history at this point, but double checking on pontentially affected mainboards is still not a bad thing to do.
  • LAN: 3Com Etherlink XL PCI
    Just a good, reliable choice for networking. All legacy Windows versions all the way up from Win95 have built-in drivers for it, which is also a huge “plus”.
  • HDD: Western Digital WD200BB (20GB 7200RPM)
    No special intention behind this drive, it is just “there” and still works fine.


Additional Hardware for certain Tests:

  • Silicon Image Sil3512 SATA Controller & Samsung PM871 128GB SSD
    These two will help me measure the PCI bandwidth.
  • Hitachi Deskstar T7K500 (500GB 7200RPM)
    This drive will tell us, how big we can go with the onboard IDE connectors and how the performance is like.
  • 2x Voodoo 2 12MB (SLI)
    A pair of Voodoo 2s is a must have for any retro-machine, that doesn't feature a 3dfx card as the primary VGA solution. They offer compatibility to older Glide games and can be used with any more powerful primary graphics card. It is an important thing to know, how well these perform and if there are differences between all the available Socket A chipsets of that era or even between boards using the same chipset.


Drivers used:

  • Chipset: VIA Hyperion 4in1 4.56v
  • Geforce 4: nVidia Forceware 43.45
  • Voodoo 5: Amigamerlin 2.9
  • Voodoo 2: FastVoodoo 4.6
  • SB Live!: Some driver from my archive, not shure 😉
  • 3Com NIC: Windows 98SE preloaded driver
  • SATA Controller: Some driver from my archive, not shure 😉

System Setup and Usage

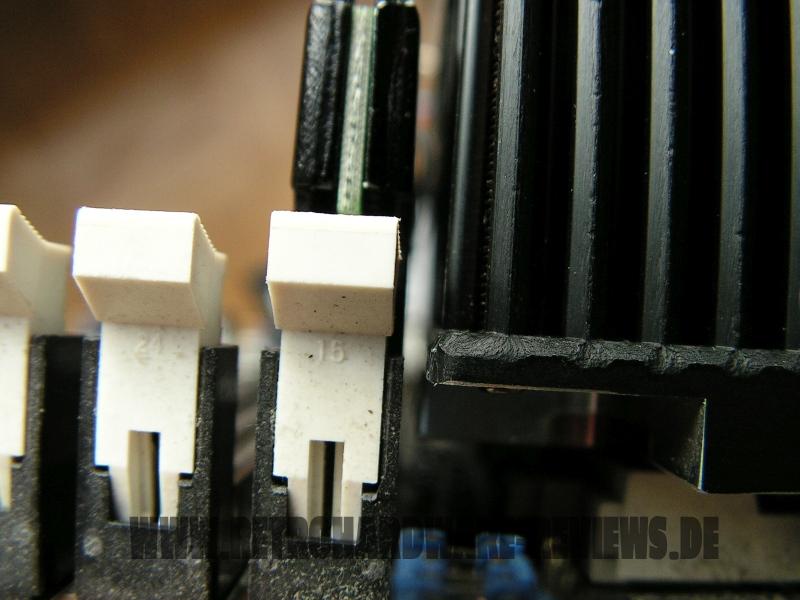
The first thing I do when I setup a retro system, is to plan how to distribute the expansion cards across the PCI slots. This is crucial for Windows 98SE based systems, because the one thing you don't want are ressource conflicts.
So after the parts are chosen and collected, I grab the manual and hope that there is useful information, which PCI Slots share ressources with each other, the AGP port and onboard devices.

Fortunately, Asus has always been known for good documentation in that regard and the manual of the A7V266-E(X) is no exception. There is a table that shows, which PCI slots sits on which INT line and also which onboard devices and PCI slots share the same ressources. This is close to perfect.. if this little mistake wasn't there:

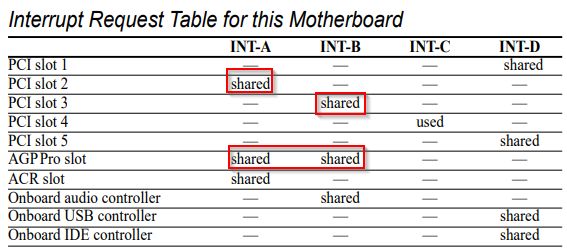
According to the table, the AGP Port shares ressources with two PCI slots, which are on different INT lines. Since a videocard only uses one IRQ (at least if it is not a card with a TV Tuner like a Radeon All-in-Wonder for example), it will only allocate an IRQ on the primary INT line, which is INT-A. I tested it for myself - the AGP ports indeed shares ressources with PCI slot 2 and (presumely) the usesless ACR slot. PCI slot #3 and the onboard audio controller sits on INT-B.

From a technical point of view, the INT routing is a little unfortunate. Most motherboards have the first PCI slot sharing the interrupt with the AGP port, which is the better option in my opinion. Normally you want to keep that slot free anyway, so that the graphics card has a little room to breathe. So with this solution..

  • ..you cannot use PCI Slot #2 for anything else than a Voodoo 2 card (which does not allocate an IRQ)
  • ..you'll want to keep PCI #1 free, to prevent your graphic card from melting
  • ..and since Asus decided, that 5 PCI slots and no ISA Slot are sufficient, you have a total of 3 PCI slots at your disposal, which qualify for different usecases.

Let's have a look at some combinations, that should work the best from a theoretical point of view.

Example 1: AGP card, 2x Voodoo 2, Storage Controller, Soundcard, NIC

This is almost impossible, and you will end up putting extreme stress (in terms of temperature) on your components. It would look like this:

  • PCI1: Voodoo2
  • PCI2: Voodoo2
  • PCI3: Soundcard (onboard sound disabled)
  • PCI4: Storage Controller
  • PCI5: NIC

Because they do not allocate IRQs, the two Voodoo2 cards (which generate a lot of heat by themselves) would be installed directly beneath the AGP card. This is the only valid location for the cards (given we want to install them with the default internal SLI cable), because the second PCI Slot shares the IRQ with the AGP card and PCI #1 shares ressources with PCI #5, USB and onboard IDE. So these two PCI slots should ideally not be populated with cards that need an IRQ.

Since Voodoo2 cards are quite large, the cooling of the AGP card would be massively affected and the Voodoo2 card in PCI #1 would also get very hot, quite possibly too hot. Soundcard and storage controller positions can be interchanged, but have to be in PCI #3 and #4. The LAN card can in theory change places with the Voodoo2 card in PCI Slot #1, BUT you would have to craft a very long internal SLI cable by yourself. A positive sideeffect would be, that a NIC normally is quite small and wouldn't affect the cooling of the AGP card too much.

If an additional storage controller is not part of the system, there are some more options.

Example 2: AGP card, 2x Voodoo 2, Soundcard, NIC

  • PCI1: FREE
  • PCI2: Voodoo2
  • PCI3: Voodoo2
  • PCI4: Soundcard (onboard sound disabled)
  • PCI5: NIC

The first PCI Slot is free then, the pair of Voodoo 2s and the soundcard move one slot down. Another option is, again, to craft a longer SLI cable and let the second Voodoo 2 card change places with the soundcard.

In reality, however things turned out to be a little different. I did the first testing without the Voodoo2 cards and installed the soundcard into PCI #4, the NIC went into PCI #5.

The first issue I encountered (even before the the Voodoo2 cards went into the system), was, that the onboard audio seemingly did not deactivate properly when I deactivated it. I went into the BIOS to Onboard Peripheral Control and set “Onboard AC97 Audio Controller” to “Disabled”, but the “Unknown Multimedia Device” still showed up in the Windows device manager, and PCIList.exe also found the C-Media audio chip, which also still allocated an IRQ.

After looking around in the BIOS, I found another option in the Advanced Chipset Features sub-menu. Usually, you would expect to only find performance-relevant settings there, but at the bottom of this menu, there is also the possibility to set “Onboard PCI Audio Controller" to "Disabled". This did the trick - the onboard audio was finally “gone”. By the way - on the same page, there are also options to deactivate the onboard IDE channels individually and also the “Onboard ACR LAN Controller”. All these settings actually don't belong there in my opinion, and should be found in the “Onboard Peripherals” section. This is a pretty bad BIOS design.

After this was sorted out, I did all the testing apart from 3dfx benchmarks, and did not come across any issues. The system ran fine, even with all memory and chipset settings configured to the fastest values.

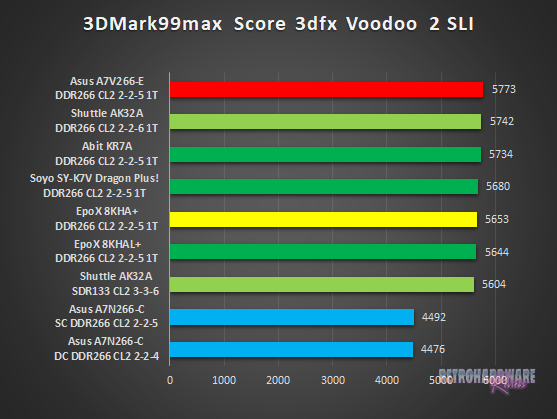
Then, I installed the Voodoo2 cards. The installation went fine and after the reboot, both cards were present and functional - according to the device manager. However, when I tried to open the display settings to check the SLI status in the Voodoo 2 tab, the system froze. I removed the NIC and the Soundblaster Live!, but the issue persisted. The only solution was to install the two 3dfx cards into PCI #4 and #5, the SB Live! into PCI #3 and the NIC into PCI #2, now sharing its IRQ with the AGP card.

After this, everything ran fine again, and I was able to complete all benchmarks with the pair of Voodoo2 cards. The IRQ sharing between the NIC and the AGP Port caused no problems during the testing, but of course I didn't use much networking during the time the AGP card was heavily used. This constellation may or may not cause issues, this depends on the networking card's chipset (I definitely had problems with realtek-based NICs sharing their IRQ with the AGP card) and maybe also on the VGA chipset, BIOS-, and driver versions and so on. The best thing you can do, is to avoid IRQ sharing of high bandwidth and/or -priority devices like graphics-, audio- and storage cards.

Apart from the installation of the PCI cards, the setup of the A7V266-E is quite simple. The only important thing to know, is how to activate the "Jumperfree Mode" with the “JEN” jumper. In "Jumperfree Mode", the board always boots with the FSB set to 100 MHz, whenever a CPU is installed. If you enter the BIOS afterwards, the board takes you to to the advanced settings page, where you can set the FSB to 133 MHz (when using a FSB133 CPU of course). Everything else is autodetected.

There is also a “THERMTRIP” jumper in the top right corner, which switches the method of temperature measurement for different CPU models. When set to “Athlon XP”, the internal temperature diode of the CPU is used for measuring the CPU temperature. The Athlon 1200C used during the review worked with both settings and reported identlical temperatures, so I recommend to leave it in the “Athlon XP” position.

A thing to mention is probably, that the “Jumperfree Mode" is not really “jumper-free". Especially in terms of overclocking, there are still settings that can't be configured from within the BIOS. The first thing is the board's overvoltage mode. There are two jumpers ("Over1" and "Over2") that have to be adjusted. With these jumpers both set to 1-2, an +0,300V offset is applied to the configured VCore.

Since the lowest configurable VCore (Thunderbird) is 1,750V, the “overvoltage mode" starts with 2,05V (the VCore setting in the BIOS still reports 1,750V, the offset is not visible). This is generally a nice option to have, but I don't recommend using these high voltages, except for short testing sessions. Otherwise, this mode will slowly degrade and kill the installed CPU, even if the cooling is sufficient.

The other thing, that is not configurable via BIOS, is the I/O voltage. There are four settings ranging from 2,50V up to 2,80V, which let you select the supplied voltage for chipset and memory. According to the manual, AGP and PCI voltage is also modified by this setting. So keep that in mind, if you use a rare and/or expensive videocard in this mainboard. This kind of voltage control is nice to have for some overclocking, but it would be even nicer, if these settings were available in the BIOS. Since the jumpers are located left from the AGP port, adjusting these settings is not the most convenient thing to do.

Benchmarks

Synthetic Measurements

Before we get into the 3DMark and gaming benchmarks, let's have a look at some theoretical numbers. These synthetic tests will exhibit the differences between the several chipsets and boards better than any game benchmark and provide us with "background information" that might be of use in understanding the timedemo results later.

Memory Performance: AIDA64 Cache & Memory Benchmark

The AIDA Memory Bandwidth test looks pretty good, the A7V266-E is one of the fastest boards here and ranks third. The memory latency test, however, looks rather bad. Only Shuttle's AK32A with SDR memory and the EpoX 8KHAL+, which has serious issues in this department, show worse results.

Application Performance: 7-Zip

Fourth place for the A7V266-E, as the second fastest KT266A based board, nothing to complain here.

AGP Performance: Final Reality Benchmark

The A7V266-E shines in the AGP bandwidth test - first place with the Voodoo 5 5500, third place with the GeForce 4 Ti installed.

AGP and PCI Performance: 3DMark 2000 and ATTO

3DMark 2000 as a whole is very focused on TnL and is by far not as interesting for retro-hardware comparisons as its predecessor. Its “High Polygon Count, 1 Light” test, however, is another good way to measure the AGP performance. In opposite to the Final Reality test, the general system performance is also somewhat of importance. The benchmark was executed with the Geforce 4 Ti installed.

To measure PCI performance, I installed a Windows 98SE compatible SATA controller with a Samsung PM871 128GB SSD connected into the system. For the bench, I chose 1024 to 4096 KB block size and picked the overall best values for the read and write throughput. This test will show, which maximum performance can be expected with fast storage options like SATA or SCSI and maybe gives a hint, if the chipset might be good for Voodoo 2 cards.

With a result around 10% lower than the fastest board, the A7V266-E shows the second lowest score in the 3DMark2000 sub-test. This is a bit surprising, given the good bandwidth results in the Final Reality benchmark.

The PCI performance, however, is really good - the Asus board shows a read throughput of over 70 MB/s and the highest overall write throughput in the test.

Storage Performance: HDTach

To measure the performance of the board's IDE and (if available) onboard IDE RAID solutions' performance, I benched one of the latest and fastest IDE drives (the Hitachi Deskstar T7K500 500GB) with the HDTach benchmark. I also tried a much more “recent” drive (the Western Digital Blue Edition 500GB), which should be even faster in theory, but the Hitachi drive produced much better results in this test.

All boards perform very similar with the harddisk connected to the chipset's IDE ports. All KT266A based boards with the older VT8233 southbridge reach exactly (or almost, in case of the Abit KR7A) 78 MB/s, the nForce-based Asus A7N266-C is on a similar level with 78,4 MB/s. Only the Epox 8KHAL+, with the newer VIA VT8233A southbridge, squeezes more than 80 MB/s out of the drive.

Gaming Benchmarks

Now that we got all the theoretical performance numbers, let's see how the contenders perform in 3D gaming benchmarks.

3D Performance: 3DMark99max

3DMark99max was released in early 1999 and comes without support for Hardware TnL. The maximum supported (hardware-) DirectX level is DX6. It is a great benchmark to reveal good overall system performance, as it rewards good memory bandwidth and latency more than the slight clockspeed advantage, that some boards have because of their factory-overclocked FSBs.

  • Version: "latest"
  • Settings: standard

The results for 3DMark99max with the GeForce 4 Ti installed are very good - the Asus board ranks second with several boards following closely. With the Voodoo 5 in the system, the results for the top five boards are even closer, with the A7V266-E ranking fourth here. Nevertheless, it gets outperformed slightly by three boards, who have their FSBs clocked more closely to the stock 133 MHz.

The results for the Voodoo 2 SLI bench are also really close, but the A7V266-E manages to come out on top. Things look a bit worse for the CPU score of 3DMark99max, however. Although the Asus board has a slight advantage in CPU clock speed over all the other participants, it gets outperformed by most KT266A boards in this test.

3D Performance: Unreal Tournament (UT99) Timedemo(s)

Unreal Tournament (UT99) was released in November 1999 and is notorious for its hunger for CPU power. I chose to use two different timedemos for comparison, of which the utbench.dem timedemo is heavily CPU bound and therefore qualifies to measure the general performance of the boards. The second timedemo benchmark.dem is as GPU limited as possible in this game. This will reveal, how much impact a faster board can still have in more GPU limited situations. This game is also perfect to show, on which chipsets and boards Voodoo 2 cards run best.

  • Version: 4.36
  • Settings: High, Min desired Framerate "0", Show Decals [x], Use Dynamic Lightning [x]
  • Geforce: D3D
  • Voodoo 2 and Voodoo 5: Glide

With a first and a second place in the UT timedemos, the A7V266-E delivers a thoroughly convincing performance. Especially the minimum FPS in the benchmark.dem timedemo are very strong.

With the Voodoo 5 installed, the results are even closer than with the GeForce 4 Ti. The Asus board ranks first and fourth here, but the respective neighboring boards show very similar performance.

Another first place for the Asus A7V266-E in the utbench timedemo, where at the very least the top three boards perform essentially identically.

The latter is even more true for the average framerate in the benchmark.dem timedemo, where all KT266A boards only differ by 0,2 FPS. The minimum FPS for the A7V266-E here are sensationally high, but please take into account that this was the very first board I ran all benchmarks on, and the only KT266A board for a long time after. My benching routine wasn't quite developed there, and I could imagine I might have hit the "Esc" key a little too late at the beginning of the timedemo, or something like that.

I didn't catch this early enough, because I couldn't do an apples-to-apples comparison soon enough. So please take this value with a grain of salt, because I think this is a mistake I created.

3D Performance: Quake III Arena Timedemo

Quake 3 Arena was released shortly after Unreal Tournament, in December of 1999. It is known to reward fast memory latency and with its normal preset, it is completely CPU limited; at least for the GeForce 4 and the Voodoo 5. The Voodoo 2 SLI cards clearly limit the Athlon 1200 here, as the timedemo will show.

  • Version: 1.32
  • Settings: “Normal” Preset, only resolution changed to 1024x768x16
  • Geforce 5 and Voodoo5: OpenGL
  • Voodoo 2: “Voodoo” Renderer (miniGL)

Pretty good results for the A7V266-E in Quake III Arena at first glance. Asus' KT266A board takes second place in the utbench timedemo and first place in the benchmark.dem timedemo. At second glance, it becomes clear that these results are aided by the factory overclocked FSB of ~134 MHz, which gives the A7V266-E an advantage in CPU clock. Asus apparently tries to compensate for relatively poorly optimized memory sub-timings (as seen in the AIDA Memory Latency results) with this. The stock-clocked Abit KR7A (which performed exceptionally well in the aforementioned benchmark) is able to outperform the Asus board by more than 2 FPS in the GeForce 4 Ti test. This is a lot, considering the close results of all boards following.

The victory with the Voodoo 5 installed would probably also rather go to Abit's board, if the A7V266-E was clocked to default.

The Voodoo 2 SLI setup clearly limits here. All KT266A based boards score the same FPS, the nForce board is also just 0,1 FPS behind.

Summary & Rating

Asus A7V266-E (VIA KT266A)
  • Layout
  • Features
  • Overclocking Options
  • Compatibility
  • Documentation & Support
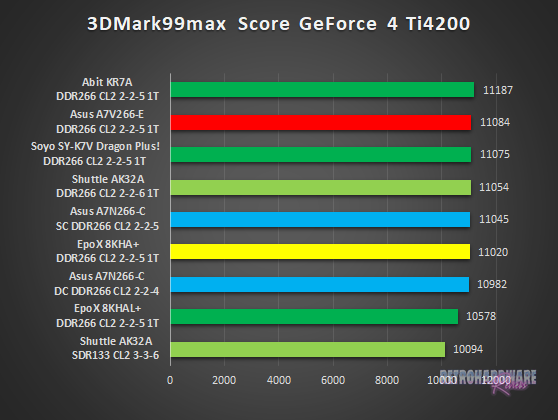
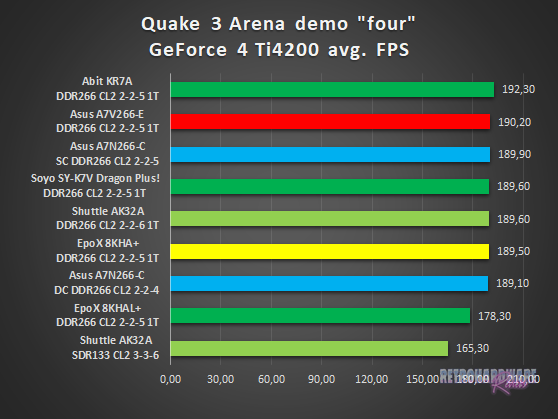
  • Performance: GeForce 4 Ti 4200
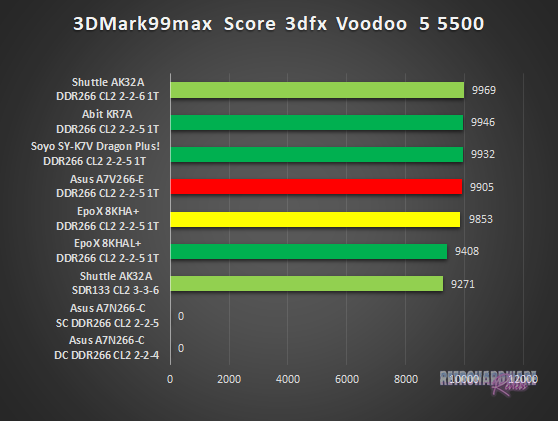
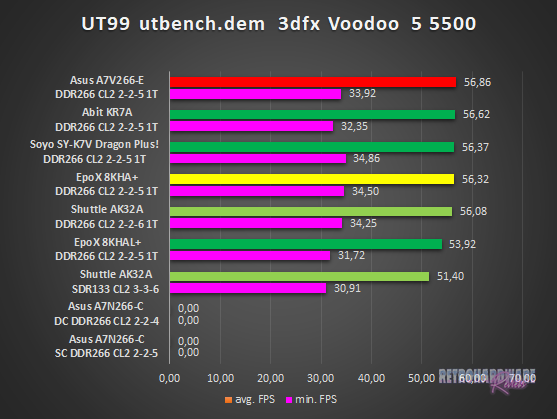
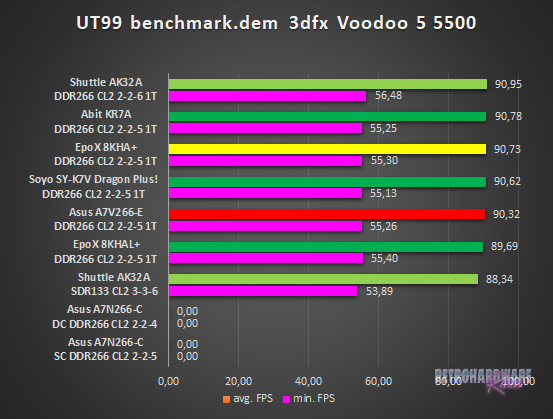
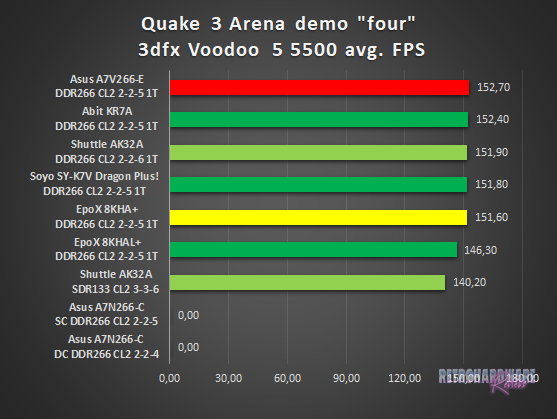
  • Performance: Voodoo 5 5500
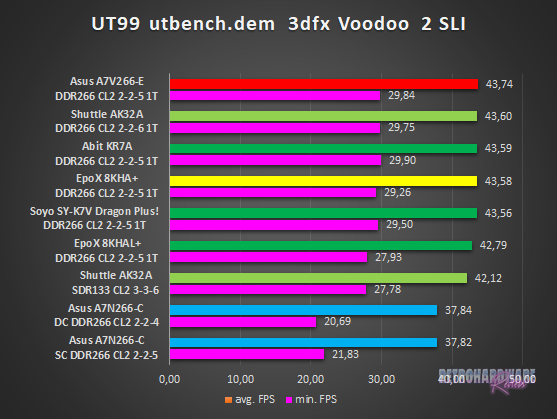
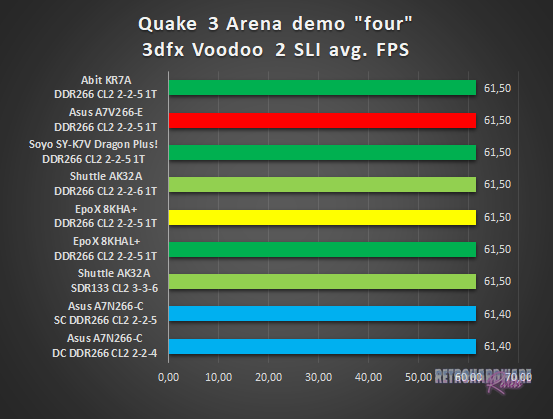
  • Performance: Voodoo 2 SLI
4.1

OVERALL

Pros Cons
+ Great performance – Inconvenient OC / voltage settings
+ Great CPU support – Layout issues
+ Good PCI and IDE performance – Bad BIOS design
Bookmark the permalink.

2 Comments

  1. Hi,
    villeneuve@Voodooalert here,
    I got my A7V266-E Rev. 2.00 out of a Targa Tower PC which was purchased brand new back then by the father of one of my best friends.
    Once I got it I also stumbled across the mess with the model numbers. My conclusion always was and still is that Asus shortly before they got the VT8233A from Via made an OEM-version for Targa with the other changes that were already in stock for the -EX-model. The BIOS downloads from Asus and Targa for the E-model are bit-identical so the hardware must be identical apart from those visual differences. Greets!

Leave a Reply

Your email address will not be published. Required fields are marked *